Leaking Manufactured Stone & Leaking Windows Halt Progress on Custom Built Home
This inspection of manufactured stone took me 400 miles from home in Louisville, KY, through the western part of Kentucky, a bit of Tennessee, and into the flat plains of Eastern Arkansas. I passed mile after mile of cotton fields and finally got to the small town of Trumann, Arkansas. This half-finished custom-built home was to be my job site for the next few days.
This home is big. Really big. Nearly 9,000 square feet big. All on one level. And the whole house was built using manufactured stone. The whole thing is covered in manufactured stone. Oh boy…
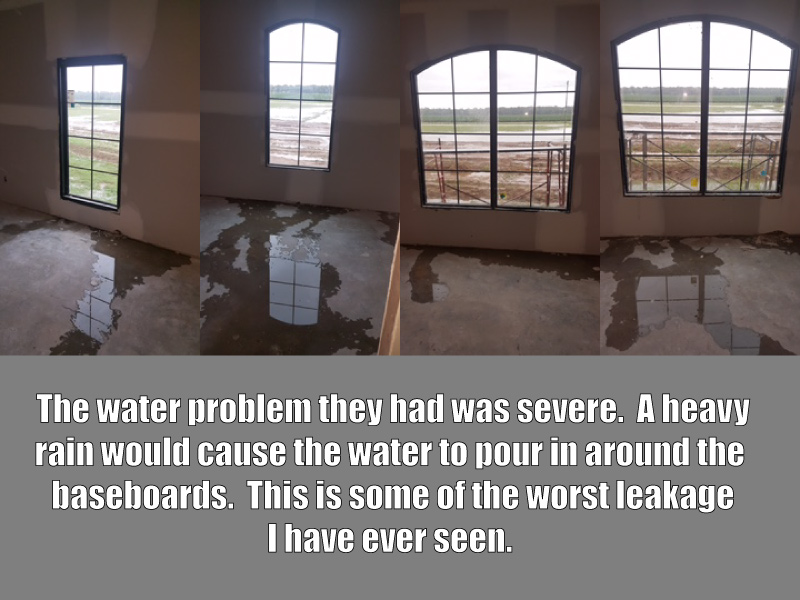
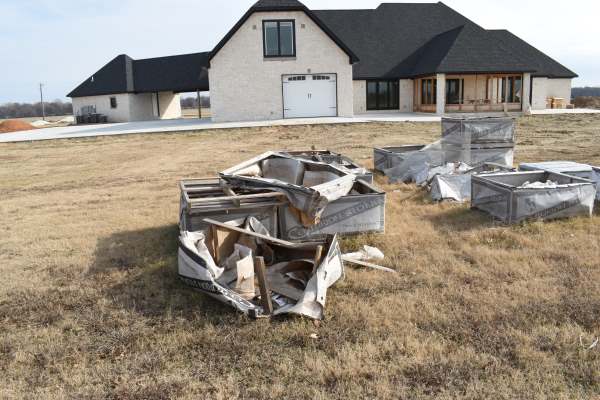
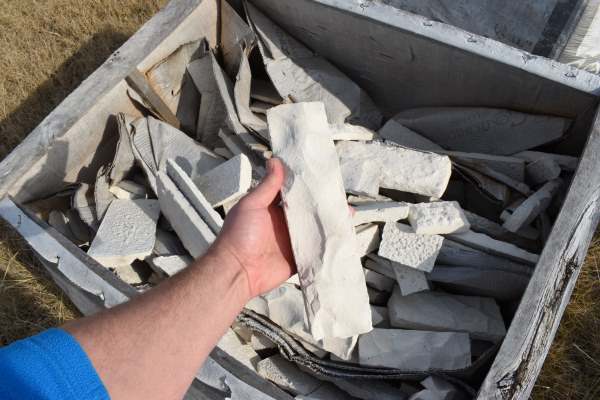
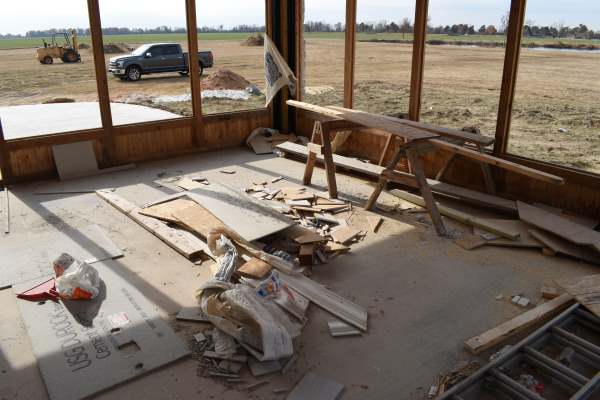
When I arrived at the home, it was a sad sight to behold. Scraps of wood and manufactured stone lay faded by the sun out in the yard. The wind came blowing in off the plains, and loose house wrap flapped in the breeze like an old tattered flag on a pole.
The home is in the country, and it was eerily quiet. The interior was cool on this early December day, but not so cold that I needed a jacket to work in, which was good because they hadn’t had the chance to install the furnace yet.
I couldn’t help but feel sad when I walked into the house. These folks had worked their whole life to build this house. Their house. Their Dream Home.
And it was falling apart before it ever had a chance to be finished.
The first step in solving any problem is figuring out what is causing it. I was at this house to help document the problems, and to come up with a solution.
I brought my camera, moisture meters, and tools to cut open the walls. Let’s light this candle…
DAY 1 – WATER DAMAGE & LEAKING MANUFACTURED STONE
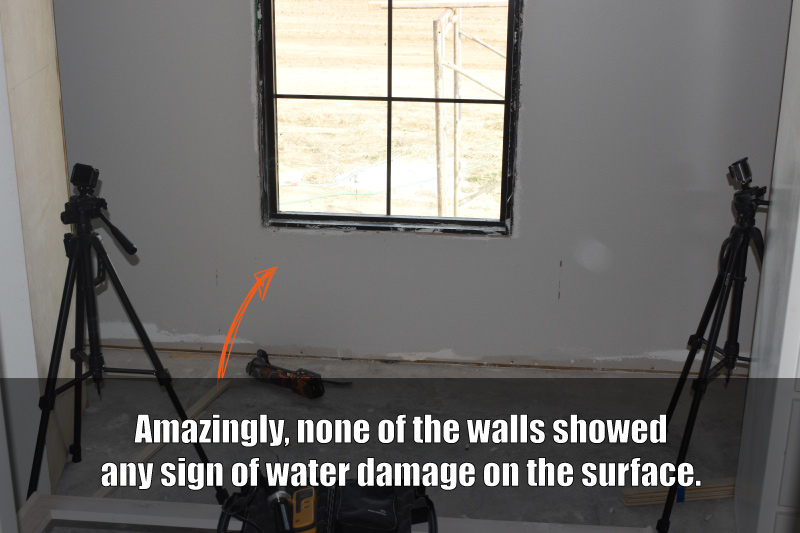
You can see in the pictures below that there were no signs of water problems on the surface inside the home. It didn’t smell wet or musty.
It was more of a fresh-cut pine and drywall compound odor. You know, “new house smell.” One of my favorites. Everything looked fine; there were no signs of moisture anywhere on the walls. In fact, when I scanned the surface of the drywall with a moisture meter, everything looked normal.
I once had a police detective for a client, and after a few hours at his home inspection, he tried to recruit me to go into law enforcement.
“You’d make a hell of a detective,” he told me.
I had never given it much thought like that, but I guess there are similarities between the two jobs.
He walks into a crime scene and tries to put the pieces together. I walk into a house and try to reverse engineer what is happening to find the root cause of the problem.
In both cases, even the smallest detail could lead you down the path of the truth.
And so, it was after my initial investigation that I began to dig deeper. That is when I saw my “one small piece.”
A small piece of house wrap was sticking out at the top of a window just a few inches.
“That’s not right,” I told myself.
You should never see wrap along the top of a window from the inside. If you do, that is a sign the installer just cut an X in the wrap and put the window in. And in time, it will leak.
To be fair, if the interior window trim had been installed, I would not have been able to see that the windows were not flashed correctly.
This was one small piece of house wrap sticking out of the wall along the top edge of all the windows. You should not see this if the wrap and flashing details around the windows are done right.
This small piece of wrap tells me the details were not done correctly. Well, that and the massive amounts of water that seeps in when it rains.
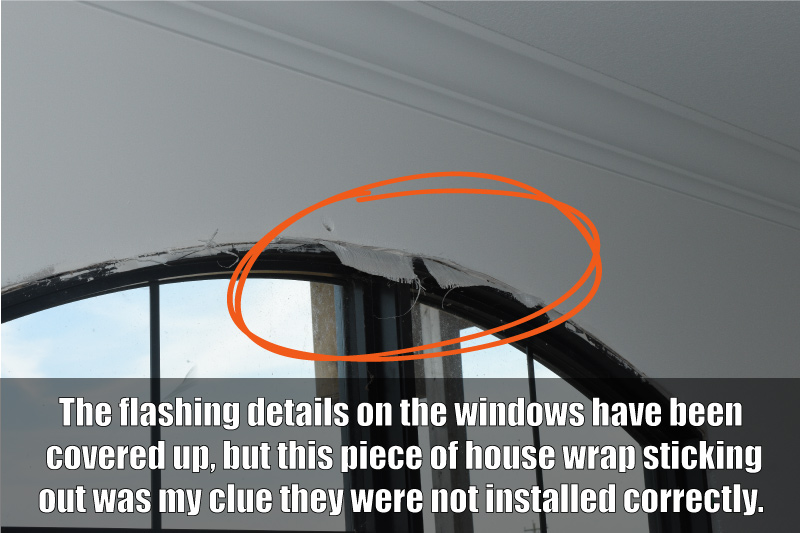
The image above shows a small piece of house wrap sticking out along the top of the window.
You should never see housewrap inside like this. The head (or top) of the window should be folded back and then the window set in place. The wrap is then brought down over the flange of the window so the water will drain around the top and not seep back in.
I wrote a full set of simple-to-follow instructions on how to install a window that won’t leak a few months back. You can read that below.
Once I assessed the situation I decided that I needed an open view. The advantage I had in this situation from an inspection standpoint is that Mike and Sherry gave me free rein to do “whatever I need to do.”
This meant I could cut into anything I pleased to get to the bottom of the situation. So, I broke out the oscillator and started opening up the walls.
Boy, what I wouldn’t give to be able to do this during my home inspections every day…but I don’t think sellers would be very happy with me cutting up their walls.
The home was built using typical stick framing (stick framing is a term used for 2×4 or 2×6 wall studs) but built using 2×6 exterior walls.
I understand that this is normal for the folks in the northern parts of the country, but my readers in the Midwest and South know that most of our homes are built on 2×4 walls.
They decided to use 2×6’s in Trumann so they could spray open cell foam into the walls and get the extra R-value from the added width of the wall. A great idea in fact. You get the envelope seal from the foam, and the added R-value from the extra depth that the 2×6 brings.
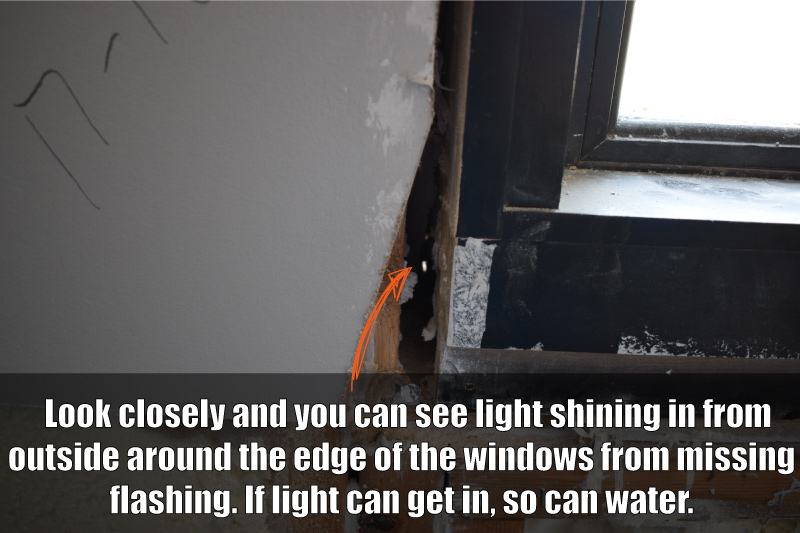
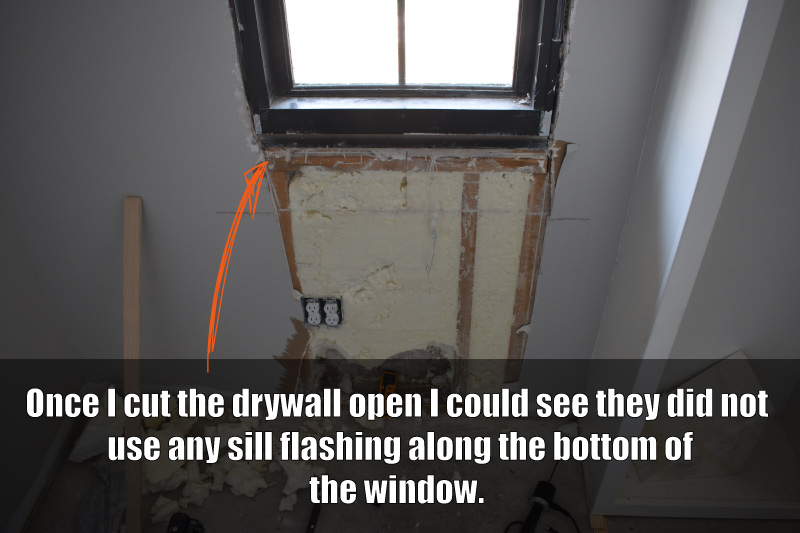
Once I had the drywall removed around a couple of the windows, I noticed that I could see daylight poking through around the jams and sills of the windows.
Obviously, you should not see light coming in around your windows. If light can get in, so can water. These holes and the lack of any pan flashings across the bottom of the window told me that whoever installed these windows did not know what they were doing…and they all were leaking.
DAY 2 – Invasive Stone Veneer Inspection
At this point, I was fairly certain I knew what the problem was. The window installation and the manufactured stone were screwed up.
The water leaked past the stone veneer and got trapped between the manufactured stone and the windows. Then, the water leaked in around the windows into the walls, and onto the floor.
Mike and Sherry had double trouble here. Not only was the stone installed incorrectly, but their windows were also.
I started cutting open the drywall under the windows to get a clear view of the flashing around the windows and the water damage to the OSB sheathing outside.
After a morning of this work, it became clear that Mike and Sherry’s problems were extensive.
Here’s the thing about construction and the importance of paying attention to the details at every step: Most of the time during the building process, we get one shot to do things right. The steps are layered, and if you botch layer 1; layers 2, 3, and 4 will have to be torn away to correct the mistake of layer 1. That is a lot of wasted time and expense.
Once the drywall and baseboards had been removed, I was able to dig into the foam insulation in the walls to reach the OSB sheathing where the manufactured stone had been installed.
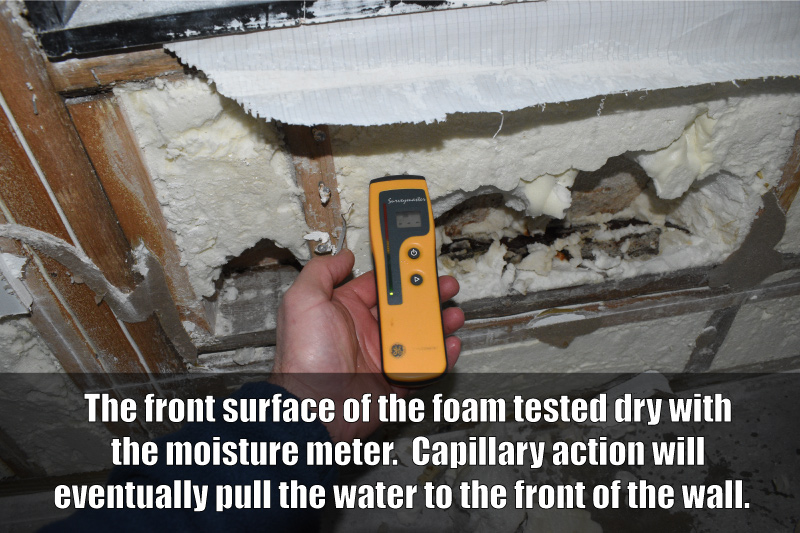
One of the more amazing things I noticed was that I could take a moisture reading at the front edge of the foam insulation and it did not show elevated moisture levels.
However, I could use my deep wall probes or dig through the foam and take readings at the back of the wall cavity, and those areas showed the leaking issue.
This tidbit of information told me that surface testing inside was a complete waste of time on this house.
The foam insulation was trapping the water 6 inches behind the drywall, so I had to get to those areas in order to get accurate readings of how bad it was. It’s also important to understand that foam is not a waterproof material, and eventually, the water would have soaked through to the inside, but that may have taken many years to happen.
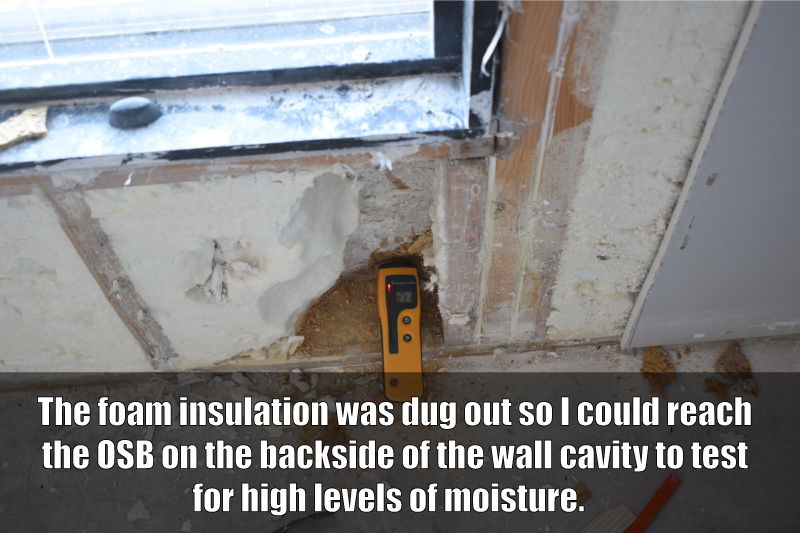
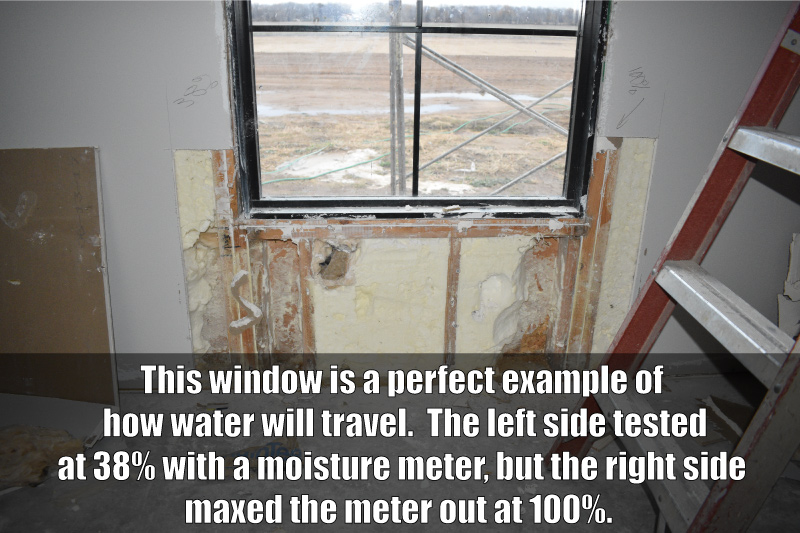
The moisture levels of the OSB sheathing varied greatly as well. It was clear that not every window leaked as badly as the next. Important note: Water will always take the path of least resistance.
When manufactured stone or windows are flashed incorrectly, it usually does not cause visual damage or give you any clue that something is happening.
Most folks aren’t lucky enough to have massive amounts of water pour out into the floor. (And oddly enough, we can consider having that pouring water “lucky.”)
But just because you can’t see anything on the surface, doesn’t mean the damage isn’t occurring. You can fill your walls with water one drip at a time. You won’t see it happening until things are catastrophic.
That is usually what happens with faulty manufactured stone installations. They leak, but not a lot, so it takes years and years for the water to make it inside. But once it does, you know you’re in deep doo-doo.
DAY 3 – Leaking After Rainfall
I was fortunate on night two, as a large rain event moved through the area. It rained all night, but it wasn’t very windy.
Just one of those long soaking rains. I returned back to the home the next morning expecting to find water running out at the base of all the windows. No dice.
The house looked the same as it did the night before.
This told me that the windows did not leak enough every time it rained for the water to show up inside. There had to be the right wind/rain combo to drive the moisture inside the structure. Most leaks are like this. Roofs, windows, doors, etc. They don’t leak every time it rains. It normally takes a special combination of wind and rain to drive the water into the home.
I did check several of the windows that I had cut open just to compare the numbers from the moisture readings the day before. They all were higher after the rain.
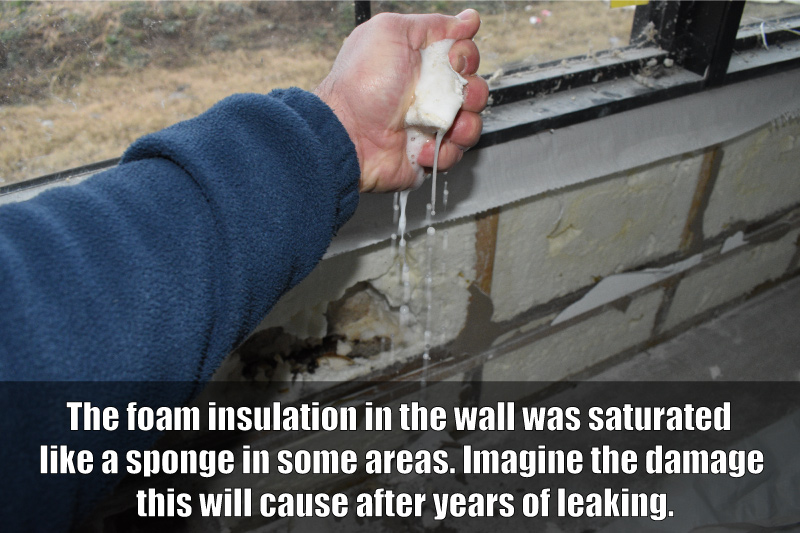
As I was checking the walls, I dug out a chunk of foam insulation and noticed it was quite a bit heavier than usual. I squeezed the block of foam and water poured from my hand like I was wringing out a kitchen sponge. I heard an “Oh lord!“ from Sherry standing behind me. That was her moment of clarity as she finally realized what she was dealing with.
I understand why sometimes it takes a visual like this for that “light bulb moment” to occur. A person who doesn’t really understand the building process, or manufactured stone, in particular, can read all the articles on the internet, talk with all the experts in the world, and watch the moisture meter go nuts in front of their eyes.
But when you see your wall insulation wrung out like a wet sponge, the gravity of the situation finally hits. You get it.
An interesting and important thing that I noticed was that even after the rain the night before, the front of the foam wall insulation was completely dry.
If you were just testing the surface of the wall, you would NOT find high moisture levels, even though the foam is saturated with water a few inches back from this point.
Surface scanning and pin type meters are only reliable about 1.5 inches into the wall.
This is important to remember when non-invasive testing measures are being performed. You are severely limiting your ability to find the problem. I know cutting out walls and drilling holes is no fun, but sometimes it is a necessary evil to know what is really going on.
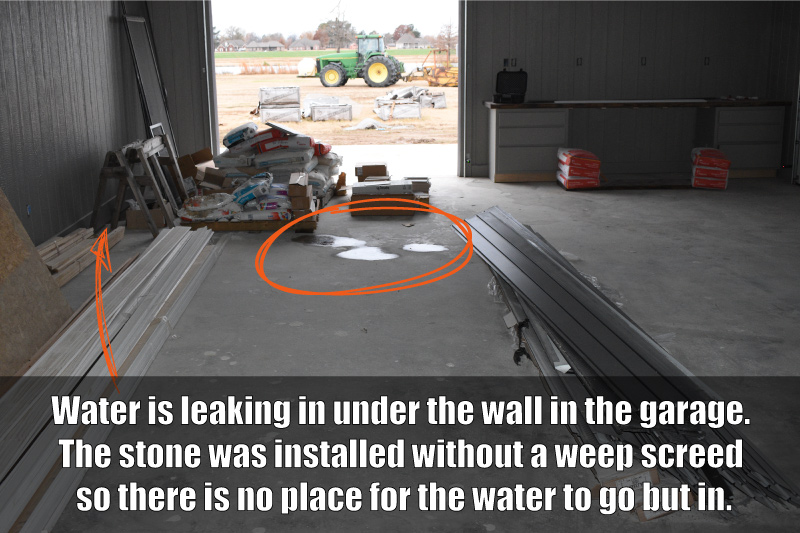
As I walked around the house again after the rain just to see if any other spots were showing signs of problems, I noticed a large puddle of water on the garage floor.
This was strange, as it wasn’t near any door or window. The construction material piled up here was also wet. As I followed the trail of water back to the baseboard it dawned on me what was happening.
The manufactured stone had been installed all the way to the ground with no weep screed present at the base of the wall. A weep screed is a flashing point at the bottom of the wall that gives moisture a place to drain, as well as give the air a way in to help dry things out behind the siding.
Since the manufactured stone did not have a drain point out (the weep screed), the water was building up and draining in.
HOW TO FIX LEAKING STONE VENEER
By now you must be wondering, “How in the world do you fix something like this?”
Unfortunately, that is not an easy question to answer. Clearly, the windows need to be re-installed, because they all leak. That will require the manufactured stone, spray foam insulation, and drywall to be removed around a great majority of the house.
The weep screed around the base of the walls was not installed on the manufactured stone. Again, a large area of the stone has to come off before the drainage point can be installed so that the details can be done in the right order.
The (almost literally) million-dollar question is: Do you roll the dice on the small areas of stone that haven’t been removed when all the other work is done, or do you strip it all and start over?
My recommendation is to strip it and start over. Why take the risk of running into these problems all over again in a few years?
Depending on where you live, and what labor rates are, I’m hearing that a proper repair job on this kind of situation can range from $80-$100 per square foot, depending on the severity of the damage. To put that into perspective, a 10×10 section of wall could cost around $8,000-$10,000 to properly repair.
So what have Mike and Sherry decided to do about their Dream Home in Trumann?
For now, they are researching products they can use to replace the manufactured stone siding. And while they don’t have a resolution yet, hopefully, they will have a happy ending that I can write about soon.
And remember folks, you eat an elephant one bite at a time. So no matter how large or daunting a task seems, step by step, you can make it through.







aside from correct flashing and proper installation of moisture barrier products – exteriors, including stone and brick (esp mortar) are permeable and moisture can and will get through (whether it be from gaps in mortar from original installation, contraction/expansion causing separation of mortar from brick or stone). Good to know to look out for the man-made stone product if the entire product also allows moisture to penetrate.
Thanks, Norman.
Hi Ben – I’m soooo glad I found your website. We just built a new home and put manufactured stone on about 1/4 of the front. The only room that has the stone exterior is my wife’s sewing room. After we were dried in (I use the term lightly) one morning after a rain we had several puddles on the floor that were not connected to the walls, and there was no evidence of water coming from the ceiling or window. Weird. I caulked a lot of the dry-stacked joints on the exterior and we had no more problems until some recent rains when the puddles reappeared. In looking at your diagrams I’m certain that the bricklayers/stone masons did not use any flashing or moisture barrier. They will be back later this week at my request. Would you suggest we remove all of the stone (it’s a lot…seems like I remember paying for 950 sq ft) and installing a moisture barrier and flashing and weep holes per your specs? I’m afraid we may be in a fight before it’s over because I feel it’s totally their fault…hate to sue somebody but it may come down to it since I contracted with them as the “experts”…but if they’re not agreeable to fix it I may have to resort to being the bad guy. What has been your experience in getting the stone masons to fix their mess?
Hey Jim – Shoot me some pics so I can see exactly what you have going on.
I am having an issue with water leaks after a long soaking rain. Originally it seemed to be primarily coming in around my large window with a 1/2 circle head window above it. The house was less than a year old and had mold behind the base board and the decorative wood paneling around the window was showing signs of moisture. After removing drywall and saturated insulation we found that all the nails coming through the OSB were rusted too. My general contractor who is also my Great Uncle called in the window manufacturer and the stone installer. No one could find anything that was undeniably causing my water leak. They then decided to remove all stone and replace the window. They thought everything was right and drywall was scheduled. We then had a 2 day rain and you can guess what happens next, its leaking. I think I have an idea about what’s causing it but I’m far from an expert and I’m worried that it won’t be repaired right and I will be dealing with this forever. If the house would look decent I would just brick the stoned sections but it will totally kill the curb appeal. I would appreciate if you could send me an email where we could exchange phone numbers so I could run a few things by you. Thanks.
Hey Brad – I’ll shoot you an email so you can send me some pics. We’ll get you through this.