DIY Guide: How to Insulate Your Attic with Blown-In Insulation
A poorly insulated attic is easily one of the top 3 things I find in just about every home where I perform a home inspection in Louisville, KY. I’d be willing to bet it’s like that in lots of other areas of the country as well. So I decided that when I finally got around to fixing my own home’s insulation in the attic, I would write a DIY guide for it. A properly insulated attic is one of the easiest and highest ROI (return on investment) things you can do to your home. Most folks can recoup their cost in as little as a year or two. So the faster you muster up the get-up-and-go to get this knocked out, the better off you’ll be.
This DIY guide explains step-by-step how to insulate your attic properly. We’ll cover the different types of insulation you can use, the prep work you need to do before adding the insulation, and everything in between. As with all things concerning a home, no guide or list can be all-inclusive, so this should be read with the understanding that you may not be able to follow it verbatim, but it should cover the topic for the vast majority of you.
As always, feel free to give me a shout if you are unsure or have questions about your process. I’m here to help. You can tweet me @inspectorben, or You can email me here.
UPDATE: Below is a list of frequently asked questions about insulating your attic. You’ll want to read the whole process to fully understand how to insulate your attic space properly, but this FAQ will get you started.
If you are curious about the energy savings, here is a copy of my utility bills a year later after finishing my attic. I cut my usage for the month nearly in half. If this doesn’t motivate you to get your home fixed, what will?!?

ATTIC INSULATION MATERIAL OPTIONS
There are many choices available for you when it comes to attic insulation. Let’s take a quick look at the most popular ones, and discuss the pros and cons of each type.
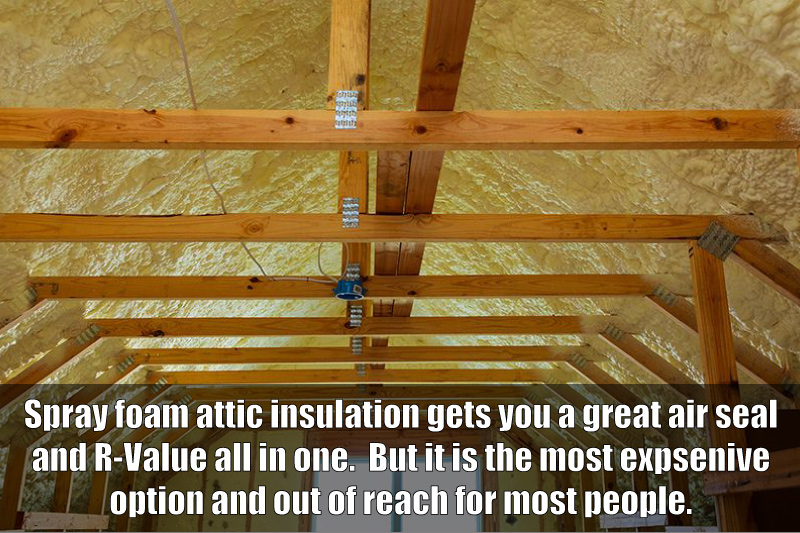
SPRAY FOAM INSULATION – If you have the money to pay for spray foam in your attic, then you may want to stop reading now and go get that done. For most of us, installing spray foam insulation in their attic is just not a DIY project, and it is too costly for your average homeowner. Does it work? Yeah, spray foam is great. So if you can write a check for it, just stop reading and go pick up the phone. Turn your attic into a big Yeti Cooler.
With spray foam, you also get the benefit of moving the home’s conditioned envelope from the living space up to the attic just under the roof decking. This will help a lot if your HVAC equipment is located in the attic (which, by the way, is the dumbest place to put your HVAC equipment). Your equipment and duct runs will no longer be exposed to extreme hot and cold temperatures once that envelope gets extended. The only caveat I can think of when it comes to spray foam insulation is that you do run the risk of trapping moisture around the roof deck if you develop a leak in your roof. If you are OK with this risk, then foam is a great choice for attic insulation…even though it can be double to triple the cost of other options.
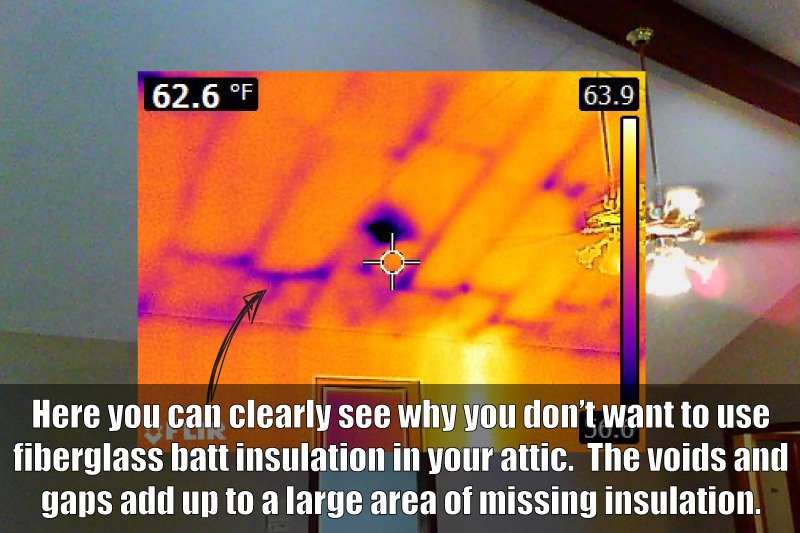
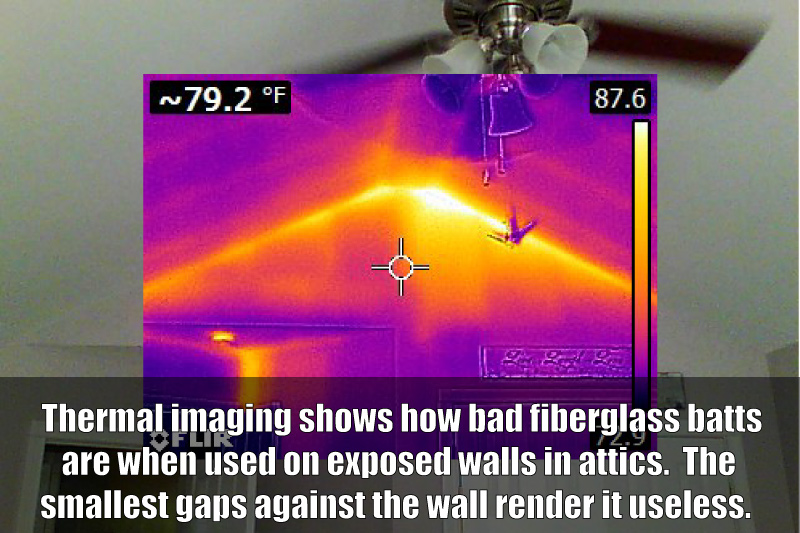
FIBERGLASS BATTS – Fiberglass batt insulation is woven rolls of fiberglass that are quick and easy to install. You cut it open and roll it out. The problem with fiberglass batts installed in the attic is that they are prone to gaps between the pieces and you don’t get complete coverage. This leaves you with areas of your ceiling that have no insulation on them. You can see an example of these gaps in the thermal image I took below. For this reason, I have to give fiberglass batts a big ol’ thumbs down. There are much better options for you to use. Skip this stuff altogether.
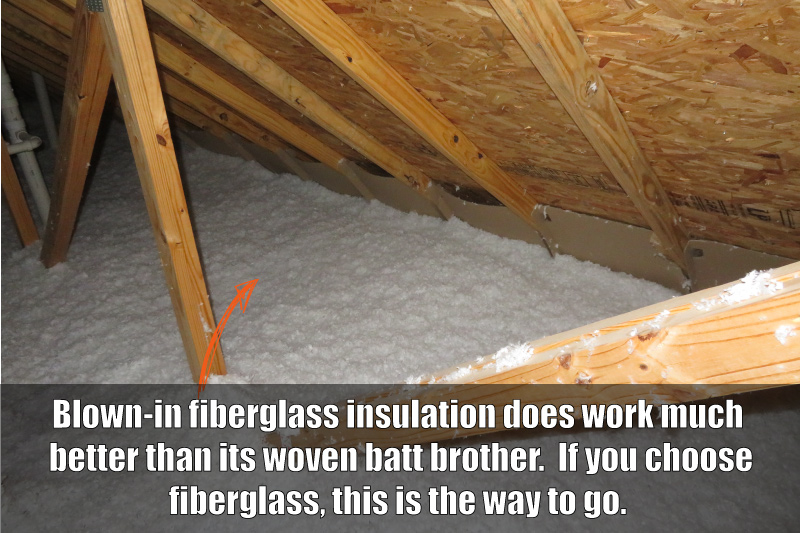
BLOWN IN FIBERGLASS – Blown-in fiberglass insulation is found in about 75% of the houses I see. This is small pieces of fiberglass that come in a bag and are installed with blower machine. The blown-in fiberglass works much better than the fiberglass batts, as you don’t have gaps in the coverage. It’s not a horrible choice, but I like cellulose a bit better for a few reasons. 1. It does a better job at restricting airflow when you have a lot of it. While neither material is listed as a true air barrier (meaning it blocks airflow completely), cellulose will do a better job at stopping air transfer between the living space below and the attic when you blow in a thick blanket of it. 2. Cellulose doesn’t make me itch. I know that shouldn’t be a real reason, but if you crawled through as much of this crap as I do, you wouldn’t like it either.
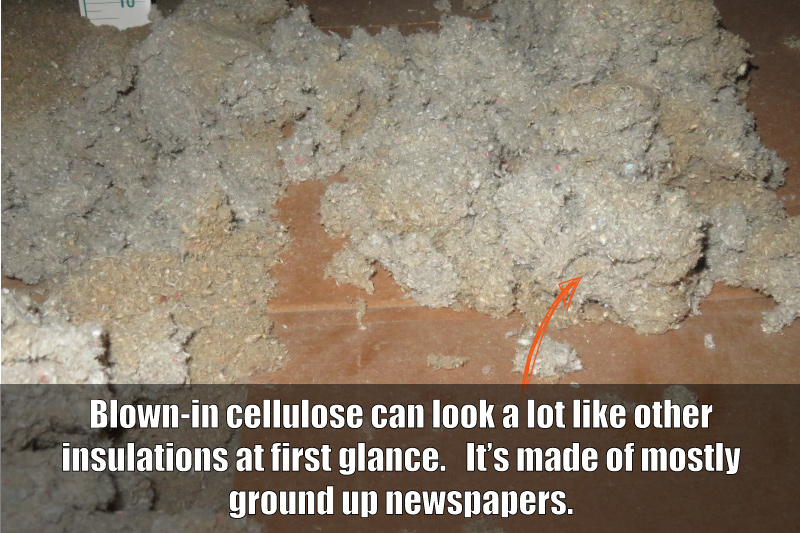
BLOWN-IN CELLULOSE – Cellulose is becoming more and more popular in new houses I inspect, and it is the material I chose to use in my home. The R-value is about the same as blown fiberglass (not enough of a difference to speak of). The cost is also comparable to blown fiberglass. As I mentioned above, I like cellulose because I don’t itch when around it, and it does a better job at air sealing than fiberglass. So for those two reasons, I decided to go with blown-in cellulose.
Note: It will not hurt anything to mix the two different materials. Don’t worry about blowing in a new layer of cellulose insulation over old fiberglass.
PREPPING YOUR ATTIC FOR BLOWN-IN INSULATION
Much like a quality paint job, the prep work is vital to a quality end product when it comes to insulating your attic. Let’s look at each step and I’ll explain what you need to do and why, in order to make your new insulation perform as well as it can.
I had about 50 hours of prep work in my attic before I even ordered my insulation from Lowe’s. While your time will vary, you need to put forth the effort if you want to reap the full benefits of your new attic insulation. Does it suck spending so much time to get things ready? Yep, sure does. You know what else sucks? Spending all that extra money every month on heating and cooling, and not being comfortable in your home. That sucks even more in my book.
Let’s look at the prep work that I needed to do in my home. Most of this will apply to you, so be sure you do not skip these steps if you want the best possible results with your new attic insulation.
BUILD A CATWALK ACROSS YOUR ATTIC
If you are OCD like me and don’t want to block off your attic for future…whatever, you need a way to traverse it without disturbing the new blanket of love that is two feet of cellulose insulation. I’m lucky in the fact that my attic is tall enough to walk around in. I freely admit that makes things easier to deal with. My plan was simple. Build an elevated floor so that I could walk from one end of the attic to the other and not touch my new insulation. How you go about this in your house will depend on a lot of factors that I can’t see from here. But what I will tell you is to make it strong, and tall enough to get the desired depth of your insulation. For me, this was about 16″ tall to the top of the walkway. I recorded a short video below to show you how I built the risers for my catwalk. These worked well, so feel free to copy this simple design.
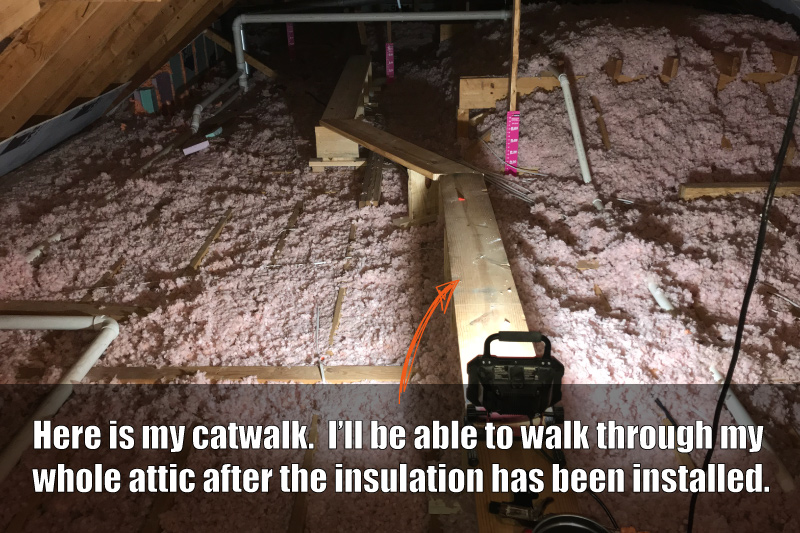
AIR SEAL YOUR ATTIC FLOOR/CEILING PLANE
This is the most important step in the prep work. Don’t get lazy here. Because cellulose and fiberglass insulation are both classified as ‘air permeable‘ (meaning that they don’t stop airflow), you must fill all the holes that lead down into living space before you pile a few feet of insulation on top of it. If you don’t take the time to seal things as much as possible, you’ll get hot/cold air leaking down into your interior walls, no matter how many inches of insulation you have. Remember that heat transfer happens in 3 ways (conduction/convection/radiation) and we need to address all of them. Take a look at the example thermal image below of my living room and you will see the orange and yellow ghosting lines leading down the wall. This was taken on a 90-degree day in early September. The warmest parts are at the point where the top of the wall and ceiling meet. That is because the hot air from the attic is being drawn down behind the drywall into the wall cavity. You can see the wall gets cooler the lower you go. That is because the temperature difference is leveling out due to the hot air from the attic moving down into the colder wall. Thermodynamics 101.
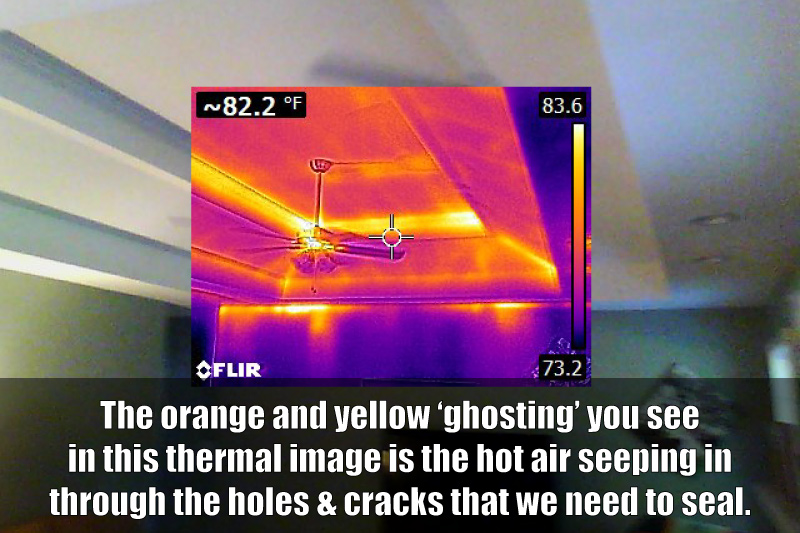
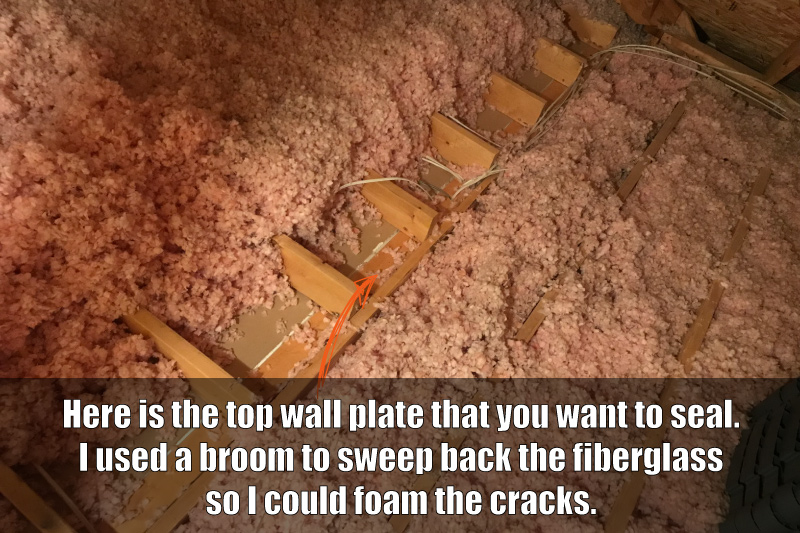
The goal here is to hunt down all the cracks and holes that allow air to move between the attic space and living space, and seal them up. This would be really easy without any insulation in the way, but in the real world, we must dig through what is already there and seal the holes up. This process is not ‘hard’, but it is not fun either. You need to track down your walls in the attic and dig through the existing insulation to find the exposed 2×4/drywall intersection. This is the point you want to fill with spray foam or caulk. Either will work fine. Keep in mind this process needs to be done ALL OVER THE ATTIC. Not just in one spot. I will freely admit this is the worse part of the job. But it is crucial if you want things done correctly.
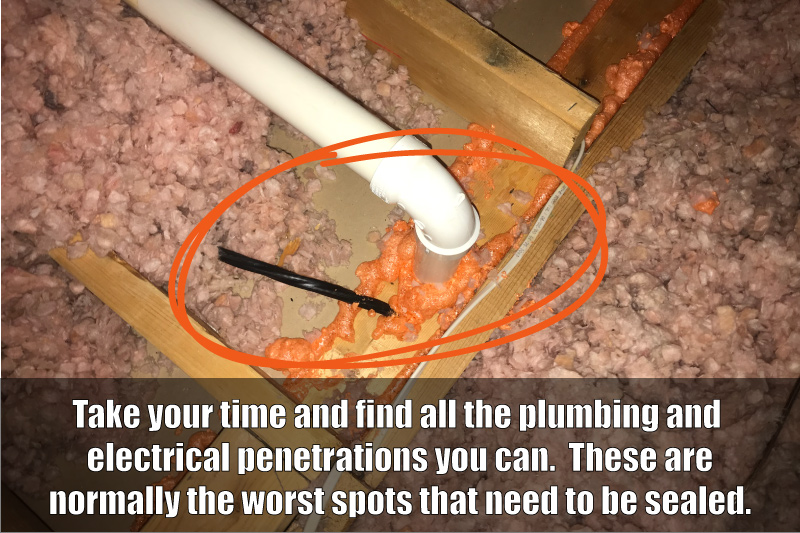
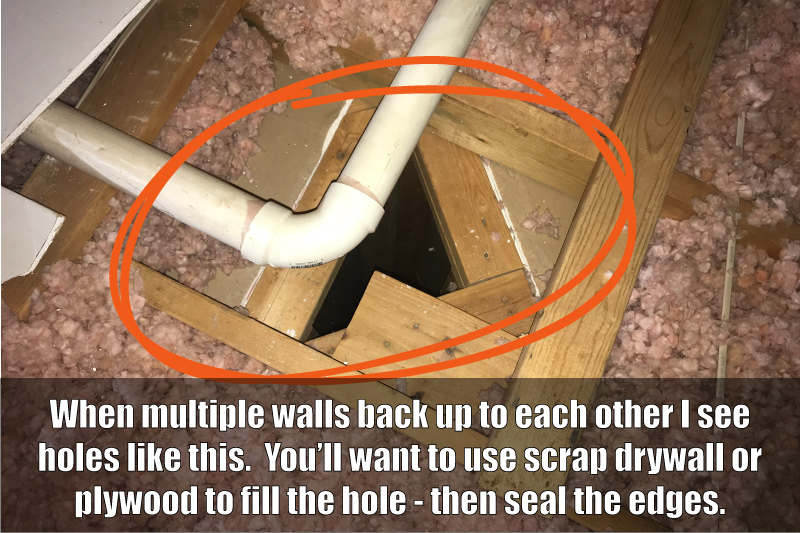
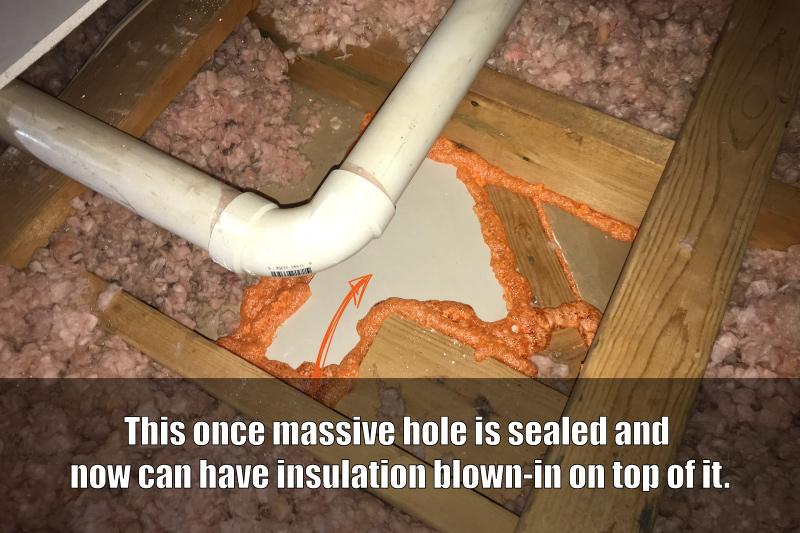
I had a couple of spots where closet walls met together where I could see down in behind the drywall from the attic. I find these areas pretty often in other houses during my home inspections so you may have them as well. A rough-cut piece of drywall, plywood, or thick XPS foam will seal things off nicely. Simply rough cut to cover the bulk of the hole, and foam in place to air seal around the edges. Just remember to support things as needed. The bigger the hole to cover, the stronger the material needs to be. You will be piling on a few feet of insulation after all this done. If you don’t build it strong enough, it may cave in from the weight of the insulation.
AIR SEAL RECESSED LIGHTS
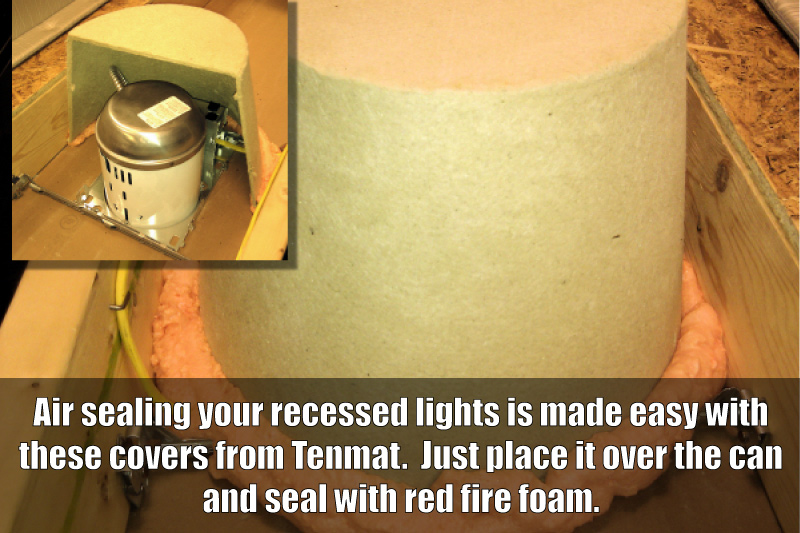
Most homes have at least a couple of recessed lights in the ceiling (aka “can lights”). Some homes have a lot of them. In the geeky-home energy world, we call recessed lights ‘6″ Chimneys’ because of the amount of air that leaks through them. If you have a lot of recessed lights, they are a big source of your conditioned air escaping the living space and making it up into the attic. There are two types of recessed lights you can have. IC and Non-IC Rated. IC stands for Insulation Contact. Most newer homes have IC Rated lights if the builder wasn’t a total cheapskate. This means you can pile insulation on them without worry of causing a fire. If your lights are the cheaper Non-IC variety, you are not supposed to allow insulation to touch the housing. Both styles still need to be air sealed however, and that is easily done with a special cover like the ones seen below. These are made to resist fire and air seal the lights all at the same time. You simply set them over the light fixture and foam them in place. Tenmat Recessed Light Covers.
Non-IC rated recessed lights are not supposed to be buried with insulation. You can normally tell you have Non-IC housings by all the holes in them. Some are also labeled with a warning that tells you not to let insulation touch this housing. The idea is they could get hot enough to ignite something in the attic and start a fire. While that may have been true in the past with incandescent light bulbs, modern LED bulbs run at a fraction of the temperature of old bulbs. (You are running LED bulbs, aren’t you?)
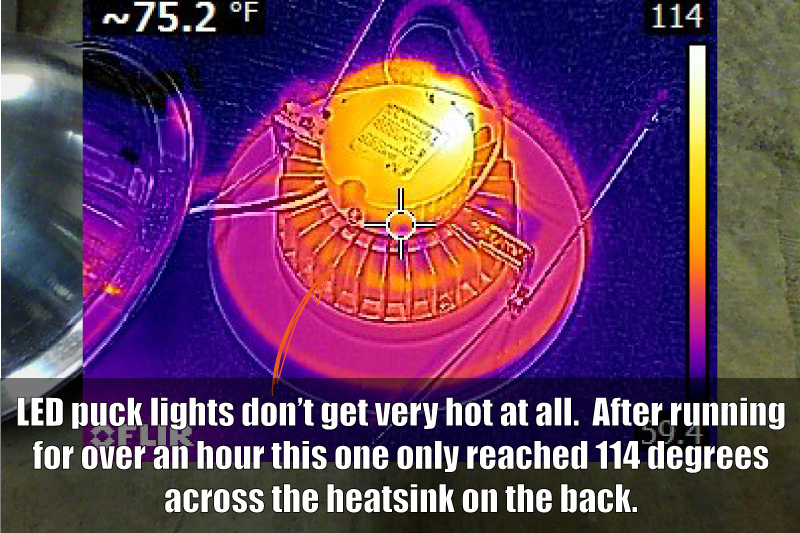
Even though the LED lights themselves run cool, the power supply of modern LED puck lights do give off a bit of heat, though I seriously doubt it is enough to cause something to burn. Installing LED lights all but eliminates the chance of something crazy like a fire happening from the heat of a light bulb in your recessed lights.
To test my theory I took one of my lights out of the ceiling and installed it on an old drop light. I left it on for 1 hour to let it get as hot as possible, and the temperature maxed out at 114 degrees. That is a far cry from a temperature that would ignite anything. I’m sure other brands of lights will vary in temperature, but I can’t imagine a scenario where they could get hot enough to cause a problem. Note: My very unscientific test was performed in the open air where things could cool. Once you install these lights in the housing, there is likely no airflow. That will cause everything to heat up more. Will it be enough to cause a fire? I highly doubt it, though I suppose the risk is always there.
If you install the proper air seal covers and use a high-quality LED puck light, the chance of something bad happening is extremely low.
INSTALL BAFFLES ON YOUR ROOF STRUCTURE
Most homes have vented attics. This means there are holes in your soffits (the area of the roof around your gutters), and holes around the peak of the roof. These two holes create a path for cool air to come in the intake (lower vent) and wash the bottom of your roof sheathing with fresh air, exiting out the upper vent. This convective loop of airflow helps remove moisture and keep the attic cool-ish (we all know there is no such thing as a cool attic in August). The insulation baffles are installed to hold back the insulation so this venting can still happen. If you don’t create a dam for the insulation to pile up against you’ll block off the path that the fresh airflow needs to travel. Doing so can cause lots of moisture build-up in the attic which leads to condensation, which leads to rot, and mold, and World War 3. Below is an awesome diagram I saw on Fine Homebuilding that should help you understand what a baffle does.
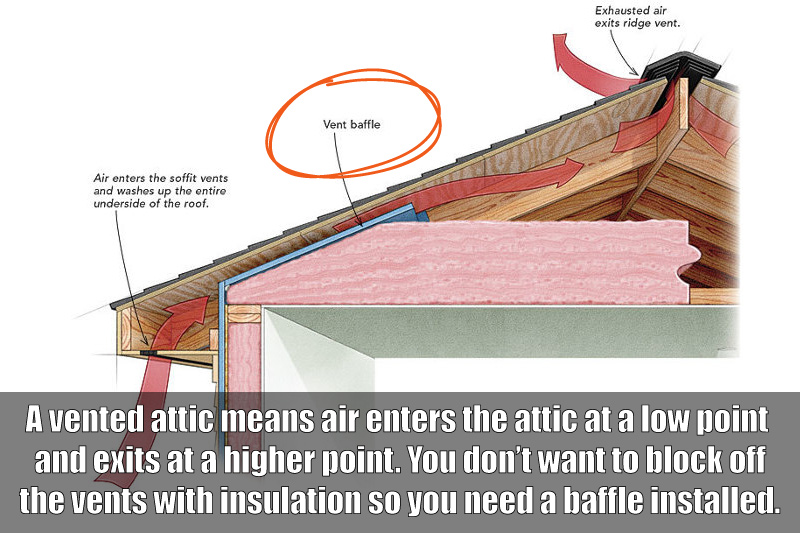
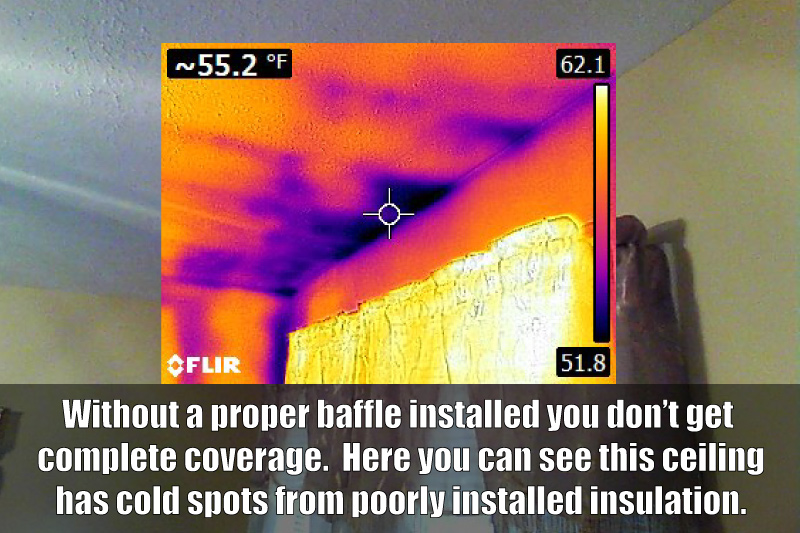
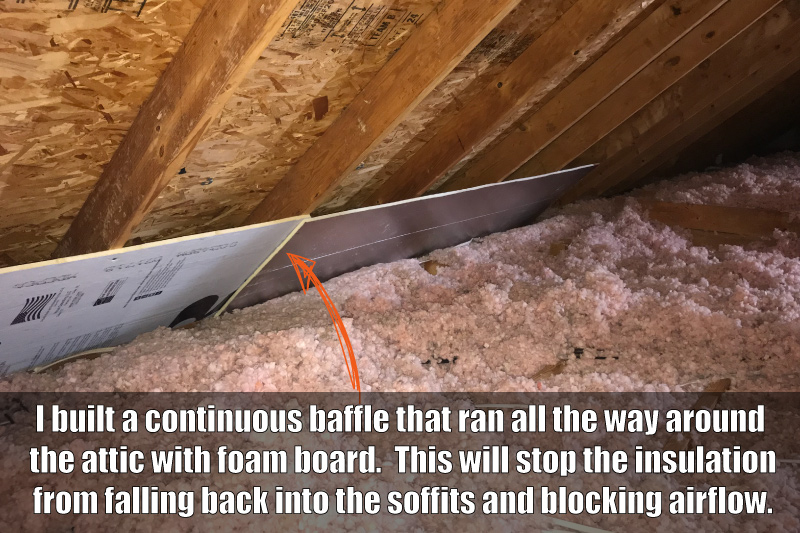
There are many options available for baffles, but I decided to make my own out of 1/2″ foam board. I bought 12 pieces and cut them in half longways, so my $10.00 piece of foam board would net me 16 linear feet of baffle 24″ tall. Perfect. You can buy plastic attic baffles but they can get pricey as you must install them in every rafter bay. Avoid the thin Styrofoam versions if you can; they are cheap and tear really easy. My best advice I can give you is to do whatever you need to do in order to create this dam and keep your venting open as much as possible. I could write another whole article on attic venting, so I won’t dive too deep into it right now. Just don’t block off your vents with your new insulation.
ATTIC KNEE WALL INSULATION
Here is one area you may or may not have in your attic (depending on how your home is laid out). A knee wall is a small wall that sticks up in the attic. These are found in rooms with vaulted ceilings or weird angles like stairwells. The best way to think about this is that if you see vertical drywall in your attic, you will need to follow this step before you blow in your new insulation. Most homes have fiberglass batt insulation on these walls from the builder and we have already established that they suck and have to go. Just like on your ceiling, they don’t have uniform coverage, and lots of times they fall back off the drywall from being poorly installed or from gravity. Once you get a gap between the face of the insulation and the back of the drywall you lose any R-value that wall had. The thermal imagine below shows the small wall from my attic before I touched it. The fiberglass batts that were installed by the builder had started to fall back off the drywall and you can see the heat from the attic radiating through the wall. The orange/yellow rectangles are the exposed section of wall sticking up in the attic.
I pulled all the fiberglass batts off my wall and installed poor man’s spray foam, also known as the cut and cobble method. This is when you use sheets of rigid foam board and cut them into strips that loosely fit between the 2×4 wall studs. I shoot for a total width minus a 1/2″. This gives me 1/4″ on each side of the stud to fill with spray foam, which ensures 100% coverage of the drywall stud bay. I ended up gluing 3 layers of 2″ board, for a total of 6″ of closed cell foam–about an R-30.

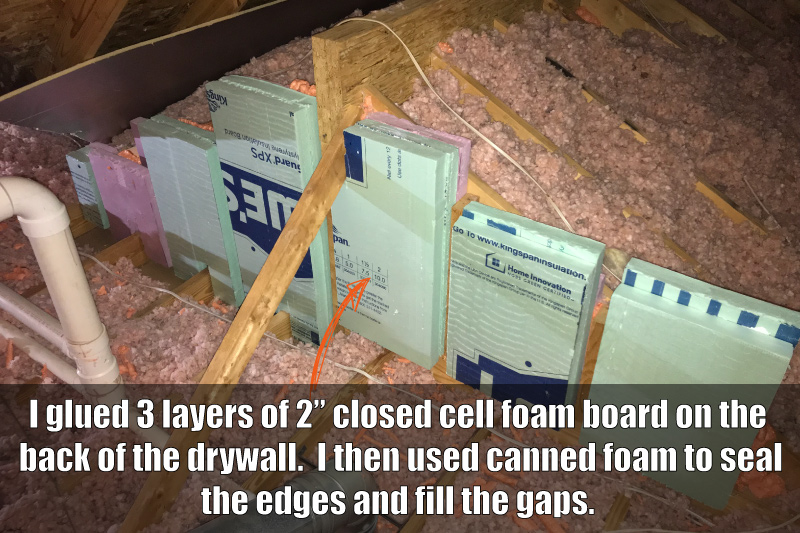
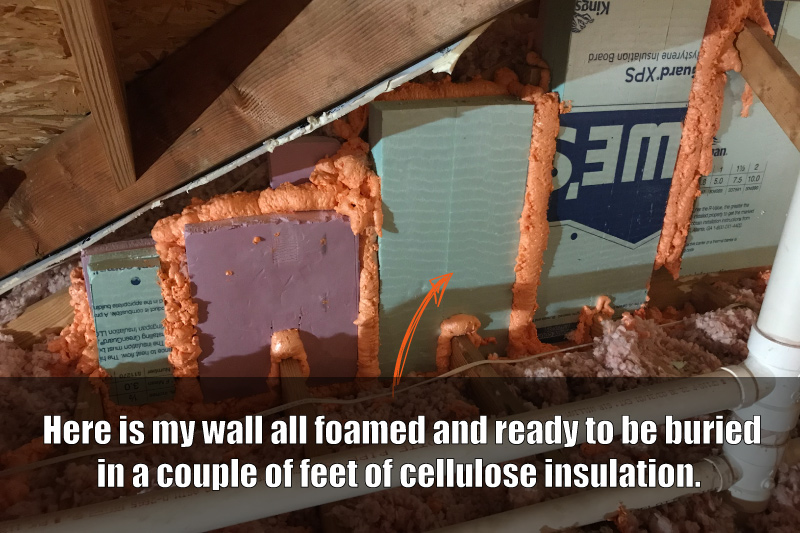
Pro-tip: When you are gluing layers of foam board together, be sure and use a glue that is water-based. I used this stuff and it worked great: Foam Board Glue If you use something that is not water-based, it will eat away at the foam and the layers won’t stick together.
Option #2 – Some homes have a lot of knee walls to contend with. If you are in that boat it may be cheaper and easier to hire a spray foam company to come in and shoot the walls with open-cell foam. You’ll need to run the numbers and see what is best for you, just make sure you don’t skip this step altogether.
EXTEND YOUR B-VENT (AS NEEDED)
Your B-Vent is a double-wall flue pipe that HVAC (furnace/boiler) systems and water heaters use to vent their flue gases out into the atmosphere. These normally run up the center of the house, and stick out of the roof. The rule is that all combustible materials (anything that can burn) must remain 1″ from this vent stack. My B-Vent made a beeline for the back of the roof in the form of a hard angle as soon as it came through the drywall. In order for me to follow the rules and keep that 1″ clearance, I needed to extend the vent straight up from the ceiling about two feet, then make the angle over to the roofline. This will allow me to blow my 20″ of insulation and not touch the horizontal run.
You may need to do this too, depending on how your B-Vent has been run (if you have one at all). If you are lucky enough for the pipe to run straight up from the ceiling to the roof, then you can skip this step. For the rest of you: make sure it’s done.
Note 1.0- This is a job you may want to leave to a pro. If you don’t get it 100% correct, you could have a flue pipe come apart in the attic, and that would be very bad. Like create a CO danger and make you sick or kill you bad. Know the limits of your abilities and knowledge.
Note 2.0- If your home only has electric utilities, you will not have any vents to worry about. You can skip this step and the next one too.
HEATSHIELD FOR B-VENT FLUE PIPES
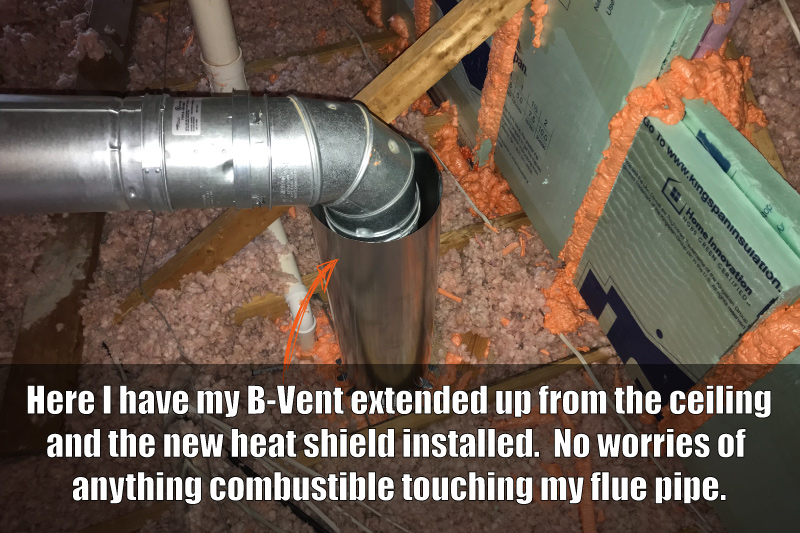
Now that we have our B-Vent extended up away from everything, let’s get our heat shield installed to keep out new insulation from touching the pipe. The rule is that you must keep combustibles off of the B-Vent pipe at least 1″. Part of me thinks this is a waste of time, but I did go ahead and build a heat shield for mine because I’m OCD, and want to set a good example for you.
However, the side of me that likes to argue decided to see how hot I could make my B-Vent in the attic. Could I set something on fire if I wanted to? I wanted to see the worst-case scenario and get the pipe as hot as I could. Let me be perfectly clear: I am telling you to follow my lead and install the proper heat shield around your B-Vent. But if you are curious about the science, here you go…
For my house, it was a total waste of time. I cranked up my water heater and let it run for 60 minutes to try and make the B-Vent as hot as possible. Even so, I could only get it to about 72 degrees Fahrenheit in the attic. That is a long way from being hot enough to set anything on fire. B-Vents have an extra air chamber and outer wall to help buffer the temperature down (in what is known as a double-wall pipe), and I can’t see a scenario where something could ever get hot enough to be a problem.
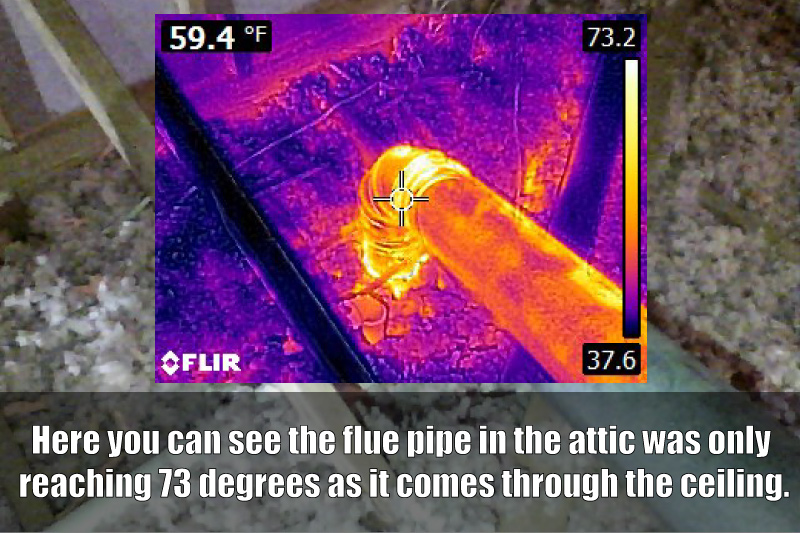
Things to remember: My home ONLY has a water heater venting into the B-Vent now because I recently replaced my old furnace with a new high-efficiency unit. It has a PVC vent that runs out of the side of the house, so now my original 5″ B-Vent only has a single water heater venting into it. This is technically known as an orphaned water heater. Your house may still have a furnace and water heater using the B-Vent, so do not take my house as the norm. It’s just an example.
Again, I’m telling you to install the proper heat shield around your B-Vent because it’s the correct thing to do.
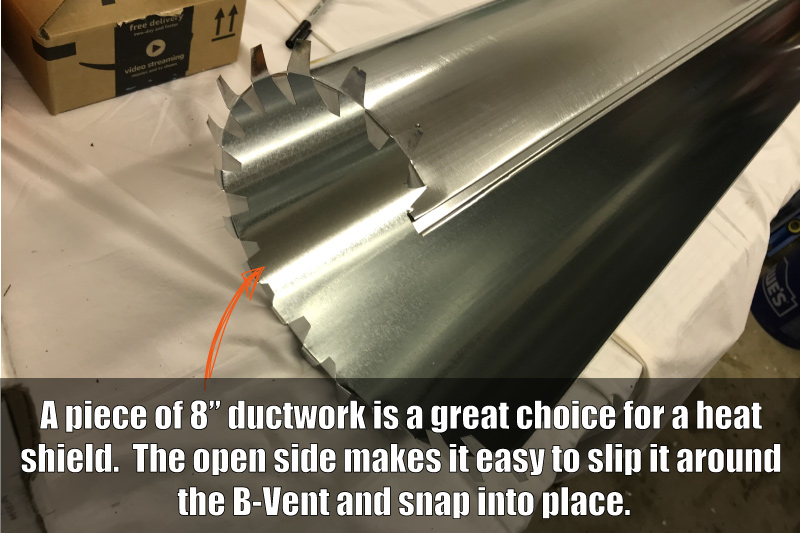
And, because it’s really easy to do. I picked up a short section of 8″ ductwork and cut tabs out of the base of the duct and bent every other one in and out. This gave me a stable foot to set the section of ductwork on in the attic. Ductwork comes in a circle shape but has to be snapped together along a seam. This will let you wrap it around your B-Vent without having to disconnect the B-Vent. Once everything was set where I wanted it, I foamed the base of the heat shield to the drywall ceiling. This locked it in place and will keep the insulation a safe distance from the B-Vent.
HOW TO INSTALL BLOWN-IN ATTIC INSULATION
You’ve worked your tail off getting things ready for the new insulation and now it’s time to install that new blanket of love.
The delivery of my materials arrived at about 9 am on a cloudy, rainy Saturday morning. The online calculator from Lowe’s website said that I needed 138 bags of cellulose insulation to reach my desired depth of 20″. That seemed a bit excessive to me, so I rolled the dice and ordered 125. The truck pulled up and dropped off the blower machine, and four pallets of insulation. Below are my tips for install day. It’s all downhill from here…Kinda.
GET THE MATERIALS DELIVERED – Unless you own a U-Haul truck, just pay the money to have all your materials delivered. It will save you half a day in time, and you won’t be exhausted from hauling all that material from the store to your house. Save your energy…you’ll need it.

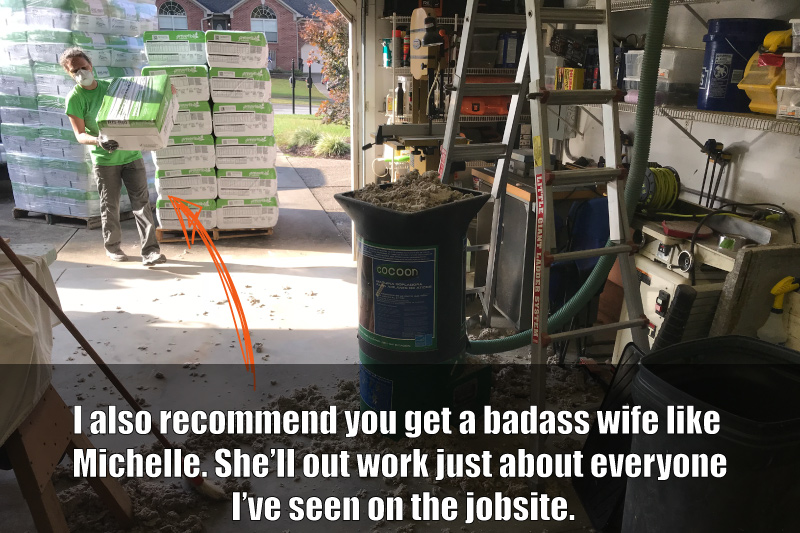
RALLY THE TROOPS – Here is where you’ll need a little help from your friends. Up until now, this has been a one-man job for me, but you can’t feed the machine down below and handle the line in the attic at the same time. I strongly recommend that you get at least one (preferably two) friends to help. Especially if you have to pack the insulation a long way from your driveway. The first five bags won’t be too heavy, but bag 95 will weigh a ton. My attic access is about 10 ft from my garage door, which made things really easy to stage next to the blower machine.
I’m extremely fortunate to have a badass wife (Michelle) who is ready for whatever I throw at her. I know what you must be thinking, “but Ben, isn’t living with you all home improvement and rainbows?” For the most part, you’d be right, but you can’t make an omelet without cracking a few eggs. So for that, I salute you, Michelle.
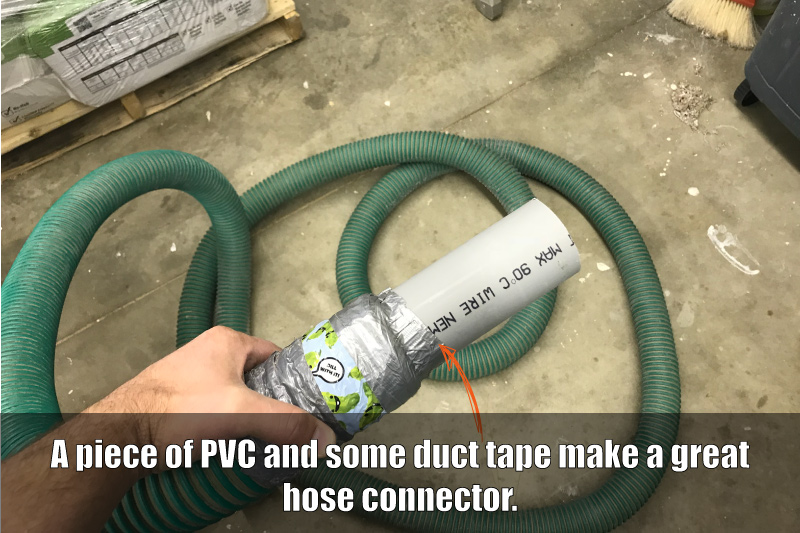
GRAB A ROLL OF TAPE AND PIECE OF PVC – Your machine (if it was like mine) will come with a trash can full of beat-up hose that may be in a couple of sections. My hose was 2″ (I’d bet that is standard for these smaller machines). Nothing will slow you down more than having to deal with these hose sections coming apart during the job, so be sure and grab a small piece of 2″ PVC with your materials list (a 2ft piece should be perfect). I just happen to have some conduit laying around and cut about a 10″ piece to use as a connector. Slip the PVC in one end of a hose section and wrap it in tape. Then slip the other end of a section in and tape the two together. This will create a solid connection for the pieces of hose so that will not come loose during the installation of your insulation. I went ahead and donated my connector to the trash can of hose back to Lowe’s so the next guy wouldn’t have to scramble. You’re welcome, fellow DIYer.
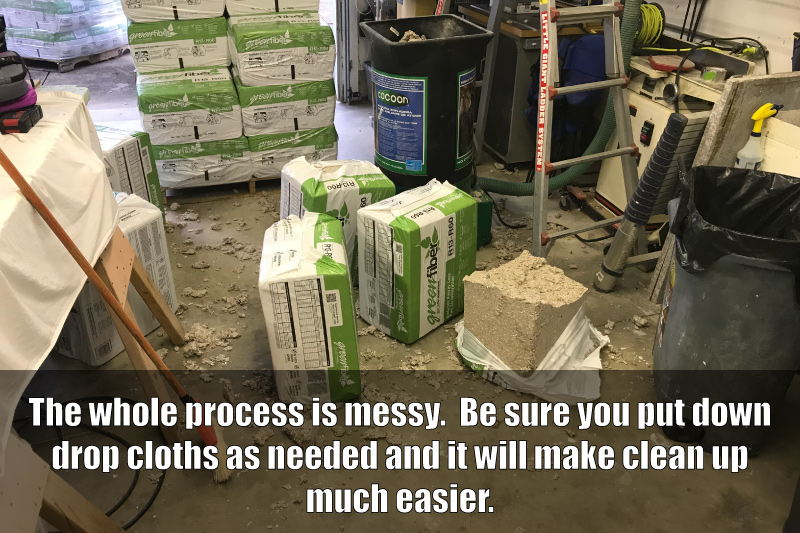
BE PREPARED FOR A BIG MESS – Once you start blowing the insulation, things are going to get messy. The bricks of material are packed densely into their bags, and you must break them apart into smaller chunks to feed the machine. You are going to have small pieces fall around the machine. If your access point to the attic is not in the garage, I highly recommend you place a large sheet or drop cloth down to help contain things. If your access is in your closet, you’ll want to clean it out or cover everything in sheets. The blower machine kicks up a lot of dust from breaking up the chunks with its agitator. Once the party starts you will not have time to stop and pick things up. The machine will run through the material just about as fast as you can feed it.
Note: This is a very dusty job. Do yourself a favor and wear a high-quality mask. I wore an N95 disposable mask but actually went through 3 of them. They got really nasty after a couple of hours so I tossed them out and grabbed another. N95 Mask
MAKE SURE YOU GET TO EVERY CORNER OF YOUR ATTIC- This should go without saying, but make sure you can reach all of the attic. The machine does a good job of throwing the material about 10ft, but you need to make sure you will reach all of the corners. I recorded a short video as an example of what to expect from the Cocoon cellulose machine from Lowe’s. As you can see it’s not blasting out of the hose, so expect to be there a while. The process is a bit slow going.
TOTAL COST FOR BLOWN-IN INSULATION
Here is the breakdown of the total cost of the project.
We started around 9 am the morning the materials were delivered, and I climbed down from the attic at about 1:30 pm, only stopping to grab some water or change my dust mask. Clearly, your time will vary, but I would think just about any home could be finished in a day.
As long as you’ve got everything prepped, and enough material to do the job, once you start the machine it is all downhill from there. Let’s look at the total cost of the job for my house. Remember: I added about 14-16″ of blown-in cellulose, installed a baffle system all around the perimeter of the attic with foam board, extended my B-Vent for the gas appliance, insulated my knee walls with 6″ of rigid foam board and air sealed my ceiling plane with fire-rated can foam.
- 125 bricks of cellulose. The cost per brick is about $10.00. However, Lowe’s has bulk pricing on this when you buy more than 100 bricks. That brought my total to $7.00 per brick. I ended up returning 18, so my total cost on the cellulose insulation itself was about $750.00.
- The 1/2 foam board used to make my baffles (or insulation dams) was $10.00 a sheet. I used 12 sheets for a total of $120.00
- The wood for the catwalk I had left over from another project, so I consider that old money and a freebie. If you had to buy this stuff I’d budget about $200.00
- I used two full sheets of 2″ rigid foam to insulate the walls. It’s $27.00 a sheet for a total of $54.00
- I ended up using about 5 cans of the Great Stuff Pro Foam. This is about $12.00 a can. You could save a bunch here by using caulk to do most of your air sealing, but the foam is so much faster it was worth the extra cost. Spray Foam – $60.00
- A couple of new short sections and an elbow of B-Vent for my flue pipe. $100.00
This brings my total to around $1300.00 in materials.
Not bad for a job that would likely cost around $3-5k if you hired a pro.
I called 3 local insulation contractors in Louisville and tried to gauge what it would cost to have this done, air sealing and all, and none of them would even give me a price. All said it was a “waste of time” to do all the extra prep work I was asking for.
This tells me that the “pros” don’t want to spend the time to do things correctly. They can make more money by just blowing in a new layer of insulation and running off to the next gig. If you decide that this job is more than you want to tackle, be sure and gauge your contractor by the prep work in this guide. If they are not willing to do things correctly, I’d advise you to move on and find a new insulation contractor.
One more thing- don’t forget to insulate your attic access point as well if it is inside your home. This is not needed if it is in your garage like mine is, but most of you have one in a closet or your hallway. If you really want to seal up your home’s envelope you can also air seal your receptacles by following this article I wrote a few years back.
Now, through the magic of video editing, you can watch my 5-hour job in 3 minutes. Thanks for reading, and if I can help in any way please give me a shout! Stay warm!



I have super tuff 1″ available to do what you did. Is this product acceptable for fire codes in an attic ? There is no storage no furnace or water heater vent pipe or can lights.
I’m not sure I understand your question, James. Any foam product that is fire rated will say so on the package- I’d imagine. If you are unsure about a specific product I’d call the manufacturer and see if they can tell you what you are looking for.
Great write up! Thank you! I’m planning a similar approach in Oregon. question…how did you air seal the exterior top plate and how did you get the rigid foam sheet baffles to connect to the top plate?
I’m considering using 1/2 rigid foam for the baffles and cutting 22.5 x 4 inch pieces to fill the gap between the top plate the rigid baffle with spray foam to lock it all in.
Thanks in advance!!
The top plate around the perimeter of the attic is a tough spot to reach. Some areas will simply go unsealed. Just do your best to get as many as possible. I used mostly canned foam (Great Stuff) and painters caulk to do all my air sealing. Your plan sounds like a good one. Just make sure you don’t block off your ventilation and you’ll be golden.
I did not do a catwalk prior to blowing in the cellulose and now wish I did. Can I lay one out on top of the cellulose?
You certainly can, but I would not recommend it. What will likely end up happening is the catwalk will feel like walking on a waterbed (if you are old enough to remember those things). If you lose your balance it may cause you to fall, and that would end very badly. At this point, I would recommend digging through your insulation and building a proper catwalk, and then ‘repair’ the holes that you made to do so.
Great video! I learned a lot and believe that “If you’re going to do a job, do it Right!”
Discovered several problems in my attic: 1) new flexible HVAC ductwork leaking (missing wire ties, gaps on fiberboard plenums, kinks, no support for long runs, etc etc) AND vinyl soffit vents Without holes!!!
I’ve sealed all HVAC collar leaks with mastic DP 1030 and new correct wire ties (2 per collar) and shortened + reroute + support all flexible R6.2 ducts. This took me 3 months…I’m senior citizen…roof is 4/12 pitch. House 60 yrs old and renovated by “reputable” contractor. BS.
Now vacuuming via Dry Vac all loose fiberglass insulation on soffits and making my own Soffit vents with 1/5″ underlayment plywood.
Have appointment with roofing company to estimate cost of removing soffit vents + cutting holes.
I hate half assed work!
If too much $$ I’ll do it myself!
Good for you Martin! Taking the time to do things correctly will pay off in the end. I’ve all but forgotten how much it sucked to prep my attic when I did it, but being able to turn down the A/C and make my home as cool as I want it to be is priceless at this point.
Thanks for the great info! I have a major list of corrections in my attic I’m trying to prep for, including fixing the horrible ducting job that was done. Metal main supply trunk and flex distribution boxes are bare, un-insulated metal in an attic, flex duct is only R4.2, lazily ran with bends and sags. I plan to redo that whole system with my own-made insulated distribution boxes, R8 ducting (stretched tight), hard elbows for turns. Plus route the bath fans through vents (instead of the hose being aimed at a soffit vent), air seal the wall tops, add more soffit and roof vents (esp to accommodate 2 new whole house fans), run cabling for security cameras, add an attic TV antenna, and then blow in R49 worth of cellulose. On that, question for you. I was originally going to suck out the current blown fiberglass to make it easier to work up there, esp with the duct work, soffit work, and air sealing. But I see you left yours in place. Is it easier to suck it all out or just leave it and work with it in place?
Hey Frank! If I had all that to do first, I’d pay someone to come out and remove it. Then I’d fix all my stuff and blow my new insulation in myself.
Yeah kinda my thought though the company I contacted recently isn’t doing any insulation work right now. Probably because of COVID. Thought about renting the machine and vacuuming myself. But that can get messy!
Thanks for the great info! Just bought our house and it seems our house is colder than I would like. So I’m looking to do this with the attic however I might have to do quite a bit more prep work. Found cracked drywall near HVAC flue with a 5×3 hole that seems to have never been closed, and a squirrel in the attic. (Neighbor said roof was rotted at one point and had lots of birds in the there before they finished the roof and they did not do a thorough job) There seems to be newly blown insulation on top of old insulation. I haven’t gone up there to check yet but what are your suggestions. Because there were/are animals up there (once they are removed) should I remove old insulation to prevent new inhabitants and fog/decontaminate the place prior to fixing the drywall and following your steps? Or fog the place with the current insulation then fill the holes?
I’m not sure I’m am following you 100%. What did your home inspector say about the condition of the attic before you bought it? Any insulation that is suspect of contamination by animals should be removed for your health and safety. Also, just a side note, depending on how old the house is, you may have old Vermiculite insulation. If that is the case be sure you have a pro perform the proper mitigation. You can research that to learn more about the risk associated with that material.
Hey Ben,
I’ve read lots of information about air sealing and insulating an attic and yours is the best. Seriously.
There’s the description from start to finish, 23 photos, 6 thermal images, 3 videos and 1 diagram. It’s not a guide it’s a documentary.
I’ve decided to air seal and insulate my attic, but there is no way my wife will load the blower. I not even going to ask her.
You must have spent weeks putting together the guide.
Thank you so much .
Thanks, Mike! It’s was a labor of love for sure. I just ask that folks share the love to help others. It’s not fun money to spend on your home, but boy is it nice to be comfortable and have low energy bills. If you need any help with your place to give me a shout! Thanks for reading.
Hello, Great info provided in this article. Had two quick question, I noticed the call out about doming all recessed lights and spray foaming around the dome. would you do the same for ceiling outlet boxes used for fans/ flush mount lights etc?
Also how would address ceiling around a bathroom exhaust fan prior to blowing insulation in?
Thanks in advance
Jon
Hey Jon- It’s a good idea to make sure you seal up all the openings in the ceiling plane that you can. Using expensive covers for your junction boxes is not necessary. You can foam around the edge of the box (you can always use caulk if the cut of the drywall is nice and clean), and just a dab of foam where the wire enters the back of the junction box, and that will seal off any airflow that may come through. You can read this old post I wrote about air sealing your electrical boxes. I’ll toss a link up at the end of this post.
Thanks for all of the info! Was thinking about just building a cat walk directly on the trusses and then blowing insulation on top of that. I was planning on making a 3 foot wide cat walk. I don’t want to spend too much time building an elevated cat walk. What do you think? Also, how much did all of this lower your energy bills?
Thanks!
You’ll thank yourself later for that nice catwalk. Spend the time upfront and you’ll be glad you did.
As far as money saved on monthly bills I lowered mine about 30-40%. My house was really bad to start, so I can’t say that you will experience the same savings- but it will help. Good for you getting this done, and please feel free to reach out to me if you have any questions.
Would you still cover your recessed lighting even if you have IC rated cans?
I would- just so you can get them out later on if you need to. If the day ever came you needed to remove the housing, it would be a nightmare digging through all that foam.
I am working on an unusual project. A 1970 tailed home on a permanent foundation. I want to add attic insulation. The trailer has one gable vent on either side. A second, no vented pitched roof was added over this.
I have no way to crawl in the attic space as the rafters and joist are 2×2’s with 4” wide paneling supports stapled in along each truss. The existing ceiling is fiberboard panel, plastic vapor barrier and 2” batting. I have removed the ceiling in one room to repair a leak from a furnace vent (now removed), but am not going to remove it elsewhere unless needed. Will replace the removed ceiling with 1/2 gypsum, barring and vapor barrier.
Blown in insulation seems to be my only option. Sealing off the attic from walls will not be possible.
Any thoughts or recommendations are appreciated.
Hey Jonathan – You have a lot going on here. Email me some pics and I’ll try to help you out.
Those messages are great! Thanks for sharing those safety tips.
Ben do you have any information on the heating and AC savings you gained from air sealing and insulating? Just wondering how long it takes to recoup the cost.
It took just under 2 years to be cash-flow positive after doing all the work. I’m not counting the hours I spent doing the work- as most of it was spent taking pictures and making sure it was documented properly for you guys. Another thing to keep in mind is your HVAC equipment will last longer as it’s only running about half as much. There is added value in that as well, it’s just tough to quantify in terms of dollars.
Good luck with your house and let me know if I can help in any way.
Hi there,
I am from Chicago suburbs.
Saw your blog on air sealing and insulation and need your advice.
The floors above the crawlspace are really cold even though the crawlspace is encapsulated. Wondering whether the cold/hot air is leaking from the attic into the wall plate into the floor. The temperature difference in the corner of the wall plate and ceiling is very similar to what you have in the blog.
Would you advise spray foaming roof attic and making it conditioned space given the extent of leaks in hip roof. Here are pictures
https://www.diychatroom.com/threads/injection-foam-in-walls-or-air-seal-the-attic.736139/
Ben,
Thanks for the very informative article. We built our modestly-sized home ourselves 25yrs ago. It is off-grid and wood heated without air conditioning. The ceiling to roof sheathing distance is only 16″, and originally had 8″ fiberglass bats. We live in Southern mountain region. Since we cannot access this space, considering adding blown insulation. The roof is a hexagonal pyramid approximately 26′ along each drip line with approximately 20° slope. Twelve soffit vents per side with over 12sq-ft venting in central cupola.
Our main question is getting the hose (or possibly PVC pipe?) up far enough to deposit the insulation. Suggestions?
Our other question is air space above the insulation. How small can we have the air gap?
For example; could we nearly fill the space and allow settling to provide for ventilation. Or, is it possible to have no air space as you mentioned for foam insulation? Any suggestions would be helpful.
Dane & Raye
Hey Dane – A lot is going on here. Shoot me an email via the contact form, and I’ll do my best to help you work through this.
Is there an alternative to the tenmat “can light” covers? I have IC can lights but at $16.97 a piece x 27 lights it gets expensive approx $450 just for light covers.
Thanks for sharing your experience and making mine even more frustrating with finding all the issues you point out that must fix before I can begin spraying. I have walls that are wide open ( the top plate is well above the sheetrock ceiling in the room) to the attic space through my house and I guess the best way is the cut pieces of 2×4 and wedge between the studs to fill that so the insulation doesn’t continue to fall down in the interior walls?
I am glad I watched your video and found my issues before speaking, so a sincere thank you!!
The reason the Tenmat covers are so pricey is they are made of rock wool and will have a much burn higher rating. DIYing a box is possible, but you may create a fire in the attic from heat buildup. If you go that route, just understand what risk are you taking. I would encourage you to strongly consider using the Tenmat covers for that reason alone.
2×4 blocking for the wall cavity will likely be the easiest route.
Wow! This guide is amazing and so thorough. Thank you so much! One question I have, is, did you seal the wall/ceiling joints on your OUTSIDE walls? I didn’t see any mention or pictures of that. Those places are pretty hard to get to in my attic.
IF you can reach it, absolutely. My house is built on a basement so most of the wiring and ductwork come from up the floor level. If you are on a slab than everything will likely come from above. In the end, every hole between the attic and living space should be filled if possible. Good luck!
Great article!
Quick question, I am planning to turn the attic into “light storage” space, if I put 1/2-inch plywood or oriented strand board (OSB) in 4-foot-by-8-foot panels, will this affect negatively the home insulation R value, air flow, or some other factor I should consider? Thanks!
If you crush the insulation layer by placing the sheets on top, you will lower the R-Value– depending on your insulation type. It may not matter in the grand scheme of things, but I suggest building a platform where you want the floor to be so you don’t create a problem for yourself.
Hey man great guide! I have a few questions as im about to start air sealing my attic. Should i put down a vapor barrier on top of my old insulation prior to installing the blown insulation? My house is from 1959 and i think the insulation is pretty old. Ive had a few companies come out and tell me i have an R Value of about 7. Thanks again for any information and thanks for the great guide. Im going to be following it.
Thanks, Alec. A VB over your old stuff is not necessary at all. Just seal up those penetrations, make sure you have decent ventilation, and dump a couple of feet of new insulation over the old stuff, and you’ll be all set!
Does every single rafter bay need a baffle? Right now I have about 1/3 of the bays with baffles, which is more than 2 per soffit vent.
I have batt insulation between the wall top plate and the rafter baffle, to prevent the blow-in insulation from falling into the soffit. On the rafter bay’s without baffles, the piece of batt insulation is between the wall top plate and the roof decking.
I would get as many as possible. Once you get below the wall’s top plate, your soffit space is typically contiguous. This means the insulation will fall back into the space and could fill it up under the right circumstances.
I’ve been preparing to insulate my attic but have a question no one has been able to address. The attic footprint (rectangular) is smaller than the second-floor footprint. Meaning the second floor is partially contained within the overall gable (3′ walls, 6′ sloped ceiling/wall, meeting the standard flat ceiling). I’m unable to insulate the sloped portion of the roof since this acts as airflow chase. So I’m wondering on what the benefit would be to only insulating the flat portion – roughly 50%. Does that mean only 50% effectiveness?
This is a common problem with this style roofline. I see insulation installed in these cavities all the time, and it performs just fine in my area if the thickness of the batts are less than the width of the rafter. Essentially, you leave a space for the ventilation to occur. It’s not a perfect solution as you will likely only have 5 inches(ish) of insulation, but its better than nothing.
What an excellent set of information on attic insulation and insulating a scuttle hatch! Thanks so much for doing that and sharing it with us!
Of course. Best of luck with the improvements.