
Kickout Flashing
WHAT IS A KICKOUT FLASHING?
You can click each link above to take you to the desired section. I do encourage you to read the whole post as you will have a much greater understanding of why kickout flashings are a critical part of your roof assembly, and why everyone should demand their installation.
I’ll bet you’ve never heard of a kickout flashing. Well, the sad news is that more than likely your builder, roofer, or remodeler hasn’t either. Or, maybe they know what a kickout flashing is but refuse to install it (the more likely scenario).
When it comes to building construction, the kickout flashing has the highest ROI (return on investment) of any building material you can install on your house.
“What does ROI have to do with a kickout flashing?” you ask.
Simple. When your home is missing this $20 piece of flashing, it usually causes thousands of dollars in rot and damage over a short period of time. See? That $20 is an excellent investment.
So what is this fantastically mysterious flashing I speak of?
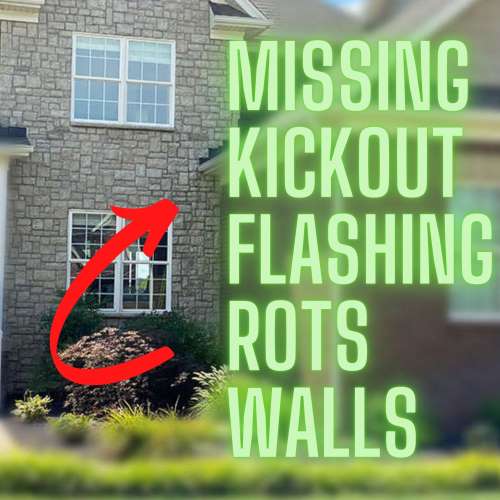
Kickout flashings are installed to help divert roof water into the gutter when that gutter stops adjacent to a vertical wall. If installed properly, they ‘kick’ the water into the gutter at the end cap and away from the wall–saving your bacon from costly rot and damage below this area. These flashings are also known as ‘diverter’ flashings, depending on what part of the country you call home.
Whatever you call them, they are essential to your roof’s water management, and when omitted (like they are 99.9% of the time), the situation can cause catastrophic damage inside the wall assembly…and you won’t even notice it happening.
Below is a video I shot at one of my manufactured stone veneer inspections that explains what a kickout flashing is, and why it is crucial to your home. Keep in mind that this is true for all cladding types and not just stone veneer. Vinyl siding, fiber cement, wood siding, stucco, and even brick veneer should all have kickout flashing installed.
ARE KICKOUT FLASHINGS IN THE BUILDING CODE?
The IRC (Internation Residential Code) added the requirement for kickout flashings starting in 2009. In the code, it is labeled as ‘sidewall flashing’ but is also referred to as ‘diverter flashing’. This means that if your home was built before 2009(ish), there is little to no chance that the roofer installed a proper kickout flashing.
I suppose there is always a slim chance you had a rockstar roofer who was ahead of the curve, but don’t hold your breath. The fact is I’ve seen ONE house with a proper builder-installed kickout flashing, and that was earlier this year. Contractors are just not installing them, even though they are required. And the building code officials, at least in my area, are not making them.
Here is what the IRC says about kickout flashings through each code cycle. Most states will use this exact wording or something very similar. Be sure and check your state’s code for any changes that may have been made to this section.
- 2009 IRC R905.2.8.3 Sidewall Flashing: Flashing against a vertical sidewall shall be by the step-flashing method. The flashing shall be a minimum of 4 inches (102 mm) high and 4 inches (102 mm) wide. At the end of the vertical sidewall, the step flashing shall be turned out in a manner that directs water away from the wall and onto the roof and/or gutter.
- 2012 IRC R905.2.8.3 Sidewall Flashing: Base flashing against a vertical sidewall shall be continuous or step flashing and shall be a minimum of 4 inches (102 mm) in height and 4 inches (102 mm) in width and shall direct water away from the vertical sidewall onto the roof and/or into the gutter. Where siding is provided on the vertical sidewall, the vertical leg of the flashing shall be continuous under the siding. Where anchored masonry veneer is provided on the vertical sidewall, the base flashing shall be provided in accordance with this section and counterflashing shall be provided in accordance with Section R703.7.2.2. Where exterior plaster or adhered masonry veneer is provided on the vertical sidewall, the base flashing shall be provided in accordance with this section and Section R703.6.3.
- 2015 IRC R905.2.8.3 Sidewall Flashing: Base flashing against a vertical sidewall shall be continuous or step flashing and shall be not less than 4 inches (102 mm) in height and 4 inches (102 mm) in width and shall direct water away from the vertical sidewall onto the roof or into the gutter. Where siding is provided on the vertical sidewall, the vertical leg of the flashing shall be continuous under the siding. Where anchored masonry veneer is provided on the vertical sidewall, the base flashing shall be provided in accordance with this section and counterflashing shall be provided in accordance with Section R703.7.2.2. Where exterior plaster or adhered masonry veneer is provided on the vertical sidewall, the base flashing shall be provided in accordance with this section and Section R703.6.3.
- 2018 IRC R905.2.8.3 Sidewall Flashing: Base flashing against a vertical sidewall shall be continuous or step flashing and shall be not less than 4 inches (102 mm) in height and 4 inches (102 mm) in width and shall direct water away from the vertical sidewall onto the roof or into the gutter. Where siding is provided on the vertical sidewall, the vertical leg of the flashing shall be continuous under the siding. Where anchored masonry veneer is provided on the vertical sidewall, the base flashing shall be provided in accordance with this section and counterflashing shall be provided in accordance with Section R703.8.2.2. Where exterior plaster or adhered masonry veneer is provided on the vertical sidewall, the base flashing shall be provided in accordance with this section and Section R703.6.3.

When breaking down this building code, you’ll see it does not contain the words ‘kickout flashing‘. Lots of building codes are this way. Construction details will develop a slang term among contractors and inspectors. It doesn’t take long before the code just becomes a string of words to those in the field.
The first couple of sentences are all we need to concentrate on right now:
“Base flashing against a vertical sidewall shall be continuous or step flashing and shall be a minimum of 4 inches (102 mm) in height and 4 inches (102 mm) in width and shall direct water away from the vertical sidewall onto the roof and/or into the gutter.“
That 4″ number is critical. If the kickout flashing installed is too small, it won’t be able to handle the large amounts of water produced during heavy rains. The flashing should be tall enough on the vertical leg to stop even the fastest moving water and direct it into the gutter.
The guys over at Dryflekt make the best kickout flashing available (shown above in the example photo). It is my opinion that this flashing should be used on every roof in the country.
It’s a malleable, molded one-piece TPO (Thermoplastic PolyOlefin) that is forgiving when installed and can move around a bit if needed.
Its vertical leg coming up from the roof sheathing is plenty tall enough to meet the 4″ requirement set by the IRC, and most importantly, because there is no seam where it ‘kicks out,’ it can catch the water without fear of leaking in the corner.
Some field-made kickout flashings are cut and bent into shape from metal coil stock. These usually either leak or are too small.
Why any roofer would use any other method for a kickout flashing is beyond me. The pieces from Dryflekt retail for around $15.00. It’s a no-brainer.
WHAT HAPPENS WHEN KICKOUT FLASHINGS ARE MISSING?
Missing kickout flashings can cause thousands of dollars in water damage, and depending on what type of siding you have, this damage can even migrate into the wall cavity behind the kickout flashing location and cause huge problems.
I’ve had a few lawsuit cases that I’ve worked as an expert witness that added up to tens of thousands of dollars in water damage from one missing piece of kickout flashing.
Understand that your roof will handle a mind-boggling amount of water during a heavy rain event. A 1″ rainfall on a 2,000 sq ft roof can produce close to 1,250 gallons of water. Depending on how your roof is designed, you may be directing nearly all that water to a single location on a roof plane.
As a fun way to help you understand the amount of water, I found this inflatable pool on Amazon.
This pool will hold 312 gallons of water.
I checked the average rainfall in Louisville, KY and we get around 45 inches a year.
A home with a 2,000 square foot roof (which is about a 1,500 square foot house) will see about 56,250 gallons a year, not counting snowfall.
That’s enough to fill this swimming pool 180 times.
If you live in a home that has a steep roof or is a large ranch layout, I could see you creeping up on 100,000 gallons a year–enough to fill this pool over 320 times. Put another way: that’s about 25% more water than the pool inside the Biltmore Mansion.
It’s a lot of water.
Let’s look at some examples of damage on homes caused by missing kickout flashing.
The first three photos below are of the same house. I was able to capture a great thermal image during my inspection of the saturated brick wall under the area where the kickout flashing should be located.
The dark blue/back section of the thermal image is much cooler than the surrounding wall. That is because the bricks are soaking wet.
The drywall behind this area was also scanning wet with a moisture meter, but I was never allowed to cut into the wall to see how much damage there actually was.


The image below is from a five-year-old home in Nashville, TN that had manufactured stone veneer across the front of the house.
The homeowner noticed a small mushroom growing out between his wall and baseboard that his home inspector failed to notice. Once he moved in, he pulled back the carpet to find a bit of rot emanating from the wall.
The drywall was opened up, and this is what he saw.
I don’t blame the home inspector for not knowing things were rotted inside the wall cavity–no one could have predicted that.
However, I do believe he should have noted the missing kickout flashing and should have given the buyer (now homeowner) a warning of what may result from this situation.

The video below was taken by yours truly a few years ago at one of my home inspections. I noticed a faint stain running down from the gutter and decided to pop the siding under it loose and take a closer look. Bingo! The whole wall under the gutter was completely rotted out from the missing kickout flashing.
This video was shot during an invasive moisture intrusion inspection I performed here in Louisville, KY. The builder had omitted the kickout flashing and it caused the wall to rot in just a few short years. You can read this whole story: MISSING KICKOUT FLASHING CREATES HIDDEN DAMAGE INSIDE WALL CAVITY BEHIND STONE VENEER.
INSTALLING A KICKOUT FLASHING
Installation of a kickout flashing is not difficult…if done during the initial build process.
It is installed with the roof’s step flashing and is literally the first step in the process.
However, when something is the first step during new construction, it is the last step when deconstructing–which means that in order to fix and install a missing kickout flashing, you have to peel back all the layers of a finished wall assembly if your home is already built.
Below is a shot of a new home being built that did not have a kickout flashing installed, so I did a poor job of Photoshopping a Dryflekt kickout flashing in place to help you visualize what things should look like.
Obviously, the flashing would be installed first, so the shingles and WRB (housewrap) would be covering most of it, but my Photoshop skills only go so far. (Hey–I’m an inspector, not a graphic artist)

I found this video from the guys at ProTrade Craft that does an excellent job of showing each step in the kickout flashing installation process. If only we could get our roofers to do this in the real world!
Since there is a bit of overlap between the siding and roof at this point of the house, there is often some confusion as to which contractor is responsible for making sure the kickout flashing is installed.
It’s a valid question. All flashings are the job of the roofer. That includes the kickout flashing.
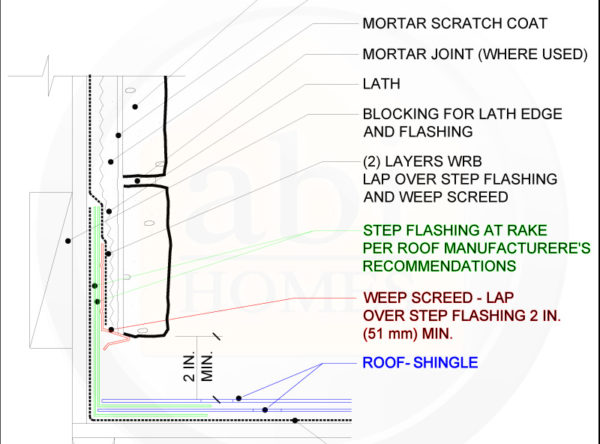
The image below is like gazing upon a Leprechaun riding a Unicorn. It just never happens. I wanted to be able to show you how things should be done, but I have never seen a kickout flashing properly installed on a sided house, so I didn’t have an example.
This photo is courtesy of Mike Guertin of JLC and Fine Homebuilding. I wrote to Mike and asked if I could use this image as I didn’t have one that showed the proper installation of a kickout flashing. How sad is that? I have terabytes of house photos and not a single one of a correctly installed kickout flashing. He was gracious enough to give me permission to use the image, and I strongly encourage you to read his JLC article on Kickout Flashing.
Thanks again, Mike. Keep fighting the good fight. Mike also has a great Instagram page you should follow.

I may not have many examples of correctly installed kickout flashings, but I do have a lot of missing and ‘failed attempt’ examples. These run the gambit of homes from modern brick veneer, vinyl siding, EIFS, manufactured stone veneer, fiber cement siding, and wood siding. Remember, every type of siding needs and requires a kickout flashing to be trouble-free.
Let’s look at some examples of damage that can be caused when the kickout flashing is left out.


KickOut Flashing Installation Details
Since I never see kickout flashings installed, I want to help educate others and provide the correct information for your contractor/roofer when it comes time to have the detail installed on your home. Below is a compiled list of different types of claddings and specific details to having a kickout flashing installed.
- Vinyl Siding: The Vinyl Siding Institute produces an installation guide that is widely accepted as the go-to source for all things vinyl siding related. You can download the full guide here. You can also download the detail image for a kickout flashing here.
- Brick Veneer: There are a lot of small local companies scattered throughout the country that make bricks. General Shale is one of the big ones, and they produce this detail for kickout flashings to be used on brick walls. This detail will work for any brick veneer house.
- MSV (Manufactured Stone): If you have read any of my other articles you know that a lot of them are about MSV. The MVMA installation guide is still king when it comes to MSV-related anything, and this detail is the best one for kickout flashing installation.
- Fiber Cement (Hardiplank): Hardiplank is a product manufactured by James Hardie. They own so much of the market that in my area, it’s just about all I ever see. The good folks at JH require a kickout flashing on all their installs. They actually take things a step further and recommend the Dryflekt kickout flashing be used in conjunction with their siding. You can download their detail here.
- Hardcoat Stucco: Since manufactured stone veneer is installed just like stucco, you can use the above MSV detail.
Having a properly installed kickout flashing is vital to the performance of your roof/wall assembly. If your kickout flashing is missing, it’s very likely causing catastrophic damage just under the surface.
Any ‘wet’ or ‘dirty’ trail running down the wall below the point a gutter meets your wall is a visual cue that you have a problem–maybe a very big one.
If you are unsure if any particular point on your home is botched, please feel free to reach out and I will help you any way I can.
One last thing. Click here for an overview of the new roof I had installed. This will give you an idea of how roofing should be done.


Ben, your explanation of what a kickout flashing is, the building codes directing roofers and siders to install them and the resulting damage from the lack of one being installed is the best I’ve seen. It’s very thorough and accurate. Thanks for bring this to people’s attention.
Thanks, Mike. That is very kind of you to say. And thanks again for the pics!
Hi Ben, I live in Louisville too and have a three-year-old home. I noticed the paint bubbling at my living room wall and we tracked the water down to the missing kickout flashing. I had a home inspection performed before I closed on the house, why wasn’t this noted in my inspection report? I wish I would have known about you when I had the inspection done, because now I’ve got thousands of dollars of damage that I will have to cover.
Hi Adam – I am sorry you are having to deal with these problems. I can’t say why your home inspector did not mention the missing kick-out flashing. I would think any home inspector who knew what they were doing would have written up a missing kick-out flashing just three years ago. I’ve been writing them up for over a decade.
If I can help you during the repair work please reach out and I will do what I can for you.
Thanks for this helpful article, Ben!
I need to point out that the actual IRC section that covers what we commonly know as “kick-out flashing” is R903.2.1 (I’m using the 2012 version). The second sentence in this section states:
“A flashing shall be installed to divert the water away from where the eave of a sloped roof intersects a vertical sidewall.”
Note that this section is at the beginning of the chapter, and thus applies to all roofing and wall types. Would have been nice if the IRC folks just used the phrase “kick-out flashing” so that everyone could spot it easier.
Thanks, Wes – I’ll look into R903.2.1. I wonder what year that put in place? I agree about the phrase ‘kick-out flashing’. It would be so much easier if you could simply search that term out!
Hi Ben,
GREAT article!! We are dealing with this situation now and it is a costly nightmare. We had a smart contractor give his opinion and he was spot on; although it’s hard to do a perfect fix since our house is over 15 years old. How crazy that a flimsy little piece of metal, improperly installed, or none at all, can wreak such havoc. You have the best summary with solutions on the internet!! 🙏🏻
Katherine
Hey Katherine – I am sorry to hear about your troubles, but you are not alone. Millions of homes are leaking right now and folks just don’t know they have the problem. Good luck with everything and let me know if I can help in any way.
Ben,
Thanks for this excellent article about kick-out flashings and their importance to keeping water from infiltrating the side wall. We just had a home inspection performed and the inspector correctly pointed out that there are no kick-out flashings at the roofing edge where the gutters meet the house sidewall.
We haven’t accepted the purchase of the house yet because the inspection results are part of the agreement. Your article says it is easy to install kick-out flashings during new construction, but there isn’t much detail about the costs and what is required to install them on an existing house in the Louisville/Metro area (2009 vintage).
The inspection pictures clearly show moisture stains running down the exterior wall of the house below where a kick out flashing should have been installed. Is our best move at this point is to insist on a roofing contractor giving an estimate on the costs to install them everywhere on this house at the side-wall/gutter points before accepting buying this home? It’s an expensive home (I guess they all are these days) and we certainly don’t want to finalize the purchase before we know the extent of costs for installation or perhaps having thermal imagery performed to indicate the level of moisture infiltration? Any advice would be welcome!
Hey Callen – What did your home inspector advise you to do? There are a lot of variables with kickout flashings. Here is a link to another article of a house off of Brownsboro Road in Louisville that had catastrophic water damage from a missing kickout flashing. It is often a lot more than just installing the flashing when it was omitted years ago. You may now have the aftermath to clean up, which is when the most money is spent. Be sure and double-check that your home inspector ran a moisture scan in the susceptible areas around the missing flashing. If I can help in any way please let me know.
Hi Ben,
Thank you for your detailed articles! Our all brick home was just inspected. The recommendation was to instal the kickout flashing in all areas that intersect. I do not see a moisture report on any of the areas that he indicates need the flashing. Should he also provide this?
We have called several gutter/sofit contractors. None have heard of this. Do you have any recommendations for the Wheeling, WV region?
Thanks so much!
Most home inspectors do not use moisture meters as you see with my articles. I specialize in water intuition with homes, so don’t let that fool you into thinking it’s standard practice with all home inspectors. I use them in day-to-day work, but that is simply because I have them and the knowledge to use them. Using tools like moisture meters and thermal cameras is well beyond the standards of practice within the home inspection industry.
Brick homes do have the added benefit of the air gap between the bricks and framing. This free air space is usually enough to prevent damage inside the wall like you normally see on vinyl siding, MSV (stone veneer), etc. While you shouldn’t skip the kickout and tempt fate, you do have a better chance of it not causing big problems.
Great article, thank you for putting this together
Thanks, Brad.