Insulate Attic Access Panel
Insulation, air movement, building science, blah-blah-blah. I know, most folks find it boring. But if you like saving money, and living in a comfortable house, stay with me here.
One of the most common things I find at just about every home inspection in Louisville in Louisville is a poorly insulated attic scuttle hatch (that is the spot you crawl through to get into the attic).
It’s typically a 2ft x 3ft hole, but I have seen them as large as 4ft x 4ft.
That is a large ceiling area that is rarely properly insulated or air-sealed. I’ll show you how to properly seal them up, and insulate those panels.
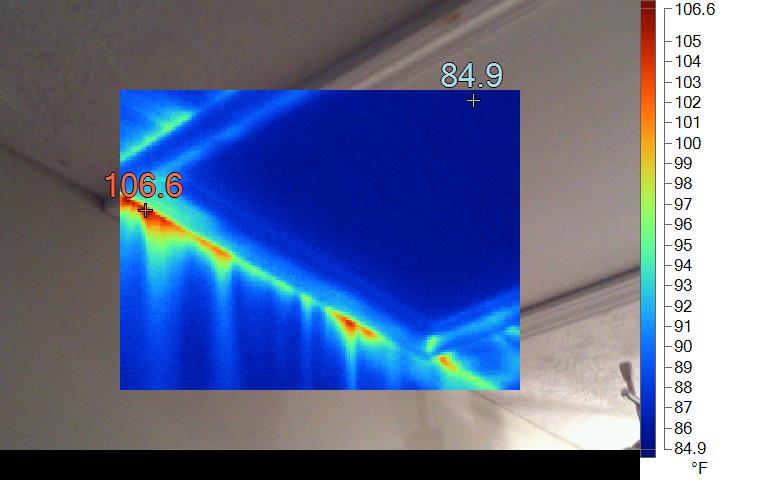
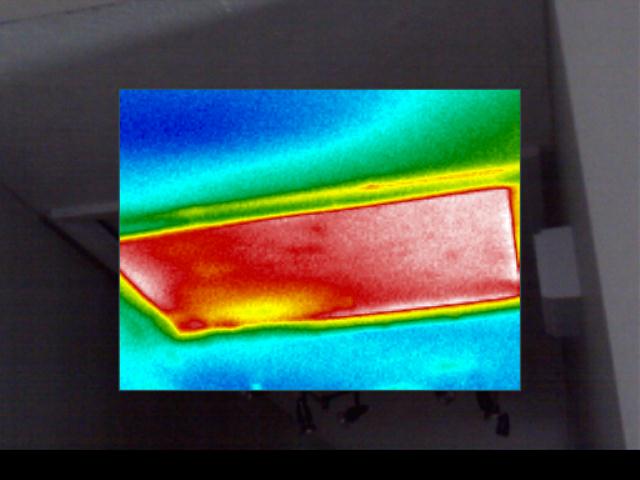
Below is a thermal picture of a scuttle hole taken during a home inspection in Louisville. You can see how the missing insulation makes a huge difference in the heat levels. There is a 15-degree difference between the hatch cover and the rest of the ceiling drywall. That’s a lot.
Insulating Your Attic Scuttle Hole
Most insulation I find in the attic of homes is air permeable (air can travel through it).
This means while your insulation in the attic may slow the flow of heat via radiation, it will not stop airflow from the living space, which carries heat via convection, if there is a path for air to travel.
The rule here is simple: For air to move, there must a path (hole in the ceiling, crack in the drywall, poorly sealed attic scuttle, etc) and a difference in pressure. That is it. The difference in pressure is most commonly created by a difference in temperature. Check this out for more info: Gay-Lussac’s Law.
Remember high school physics?
Heat travels in 3 ways.
Conduction in solid materials.
Convection in fluids (liquids or gases).
Radiation through anything that will allow radiation to pass.
I like to think of it as money travels in 3 ways. After all, every bit of heat you lose has is a dollar bill attached to it. When you heat your home, your furnace creates lots of BTUs (British Thermal Unit) in order to do so.
The cheapest BTU is the one you never have to produce. Heat the area once, and keep it locked in.
Our attic situation calls for us to concentrate primarily on convective heat loss. While conduction and radiation are in play most of the time as well, let’s stick with convection for now.
Convective Heat Loss:
When we heat our home, the furnace produces hot air that wants to rise to the top of the room. Always remember that warm air rises. Heat does not rise, but warm air does.
As the temp in the room goes up, that hot air will escape through any crack in the building’s envelope around the ceiling. Remember: air only needs a path and a difference in pressure to move.
Since you have heated the air with your furnace, you have created that difference in temperature, which created the difference in pressure. The air is able to seep in around lights (especially recessed lighting which has lots of holes), ceiling fans, smoke detectors, and of course, attic scuttles.
We know the air is leaking out, and if that air is not replaced, you will have negative pressure in your house. Mother nature does not like pressure differences.
For every bit of warm air you lose up top, you draw in cool air from the bottom of the house. If we seal things up so the warm air at the top of the room can’t get out, we’re already ahead of the curve.
Repairing Your Attic Scuttle Hole
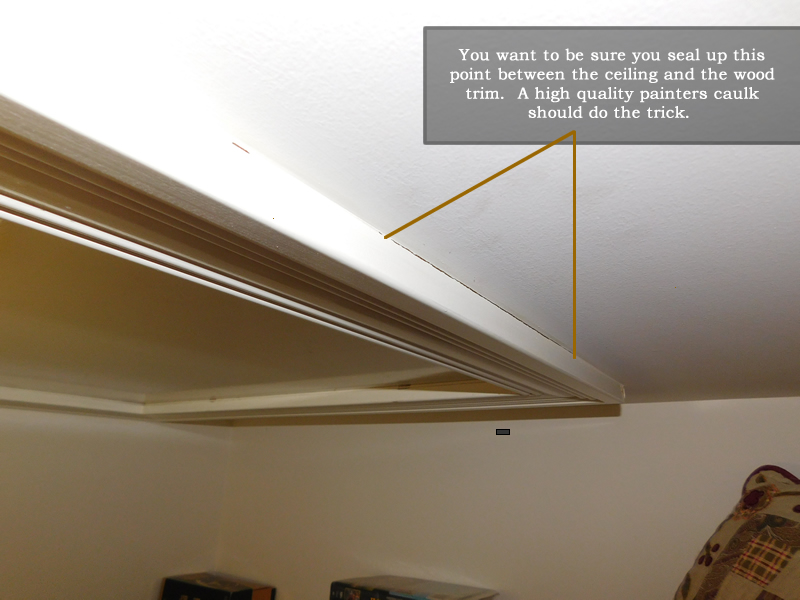
Most homes have a panel that lifts up and slide to the side to get into the attic. There is usually mitered casing around the edge to hold the panel up in the air. The first thing you need to do is seal this trim to the ceiling.
Use a high-quality painter’s caulk to fill any gaps here. Be sure to get all the way around the frame. This not only will stop any airflow from spilling under the wood trim, but it will also help to hold the wood in place against the ceiling. Note: This is also the time you should make sure the miter frame is well secured to the ceiling.
I recommend a couple of trim screws into the framing (in the attic) above so you don’t have to worry about this working loose or wanting to fall in the future.
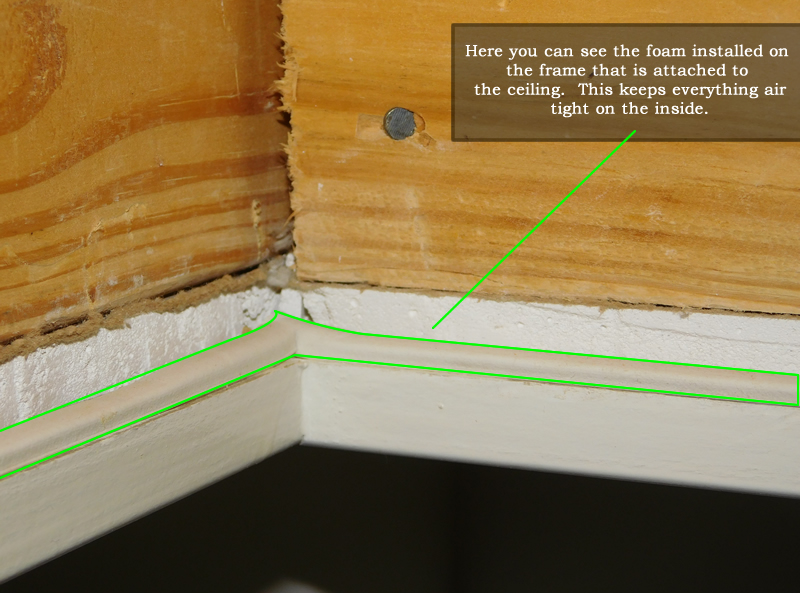
Next you need to install a foam gasket (or weatherstripping) around lip of the frame.
This is what your panel will rest on. The foam is what air seals things around the removable panel. I’ve seen some people caulk this, but that is a bad idea. If you need to get back into the attic, you have to cut all that caulking out, which is a pain in the butt.
The gasket works fine if installed properly. When installing your gasket, be sure to clean the lip of the frame. If you try to stick it down on dirty trim, it will not stay in place. Also, be sure and overlap your corners.
Building Your Attic Scuttle Panel
Now that the ceiling frame has been caulked and weather-stripped, we can turn our attention to the panel itself. There are a couple of things that we must do here. One is to make sure that the panel stays flat, and has a good layer of insulation on the back of it. Most of the hatches I see have either no insulation at all, or maybe (if you’re lucky) will have a piece of fiberglass batt insulation kinda/sorta drooped across the hole. Neither one is any good. We can do better.
I’m going to assume your panel is nothing more than the piece of drywall that was cut out (I assume this because this is what I see 99% of the time during home inspections.)
If so, ditch it in lieu of a new panel made of 3/4 MDF. You can get MDF at Lowe’s or Home Depot. Both stores even sell smaller “project panels” that could fit the bill (depending on what size your hole is.) Expect to pay around $12 bucks for a 2×4 piece.
MDF is basically sawdust and glue pressed together. It is strong, flat, and easy to cut and mill. It also takes paint well. Cut your panel down to about 1/8″ smaller than your hole in the ceiling. Be sure you leave enough board that it overlaps the foam weatherstripping you installed on your frame in the ceiling.
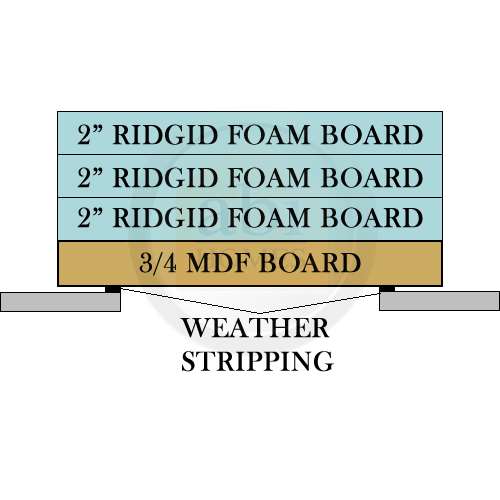
Now grab a sheet of 2″ rigid foam insulation board. I call it “Poor Man’s Spray Foam”. It comes in 4×8 sheets, and it cuts with a utility knife with ease.
It’s also a rock star at insulating flat panels like the attic scuttle, or the walls of skylights in the attic. Anyplace a piece of fiberglass batt insulation would fall off, this stuff can get glued in its place, and it’s not going anywhere. It also has an R-Value of about 5 per inch, which is way more than fiberglass.
Cut your foam to the same size as your panel, and glue it in place with white the painter’s caulk you used to seal the frame with.
Pro Tip: Don’t use construction adhesive. It will melt the foam and things won’t stick together. Put as many layers of foam on as you can. Go nuts here. I aim for a minimum of 3, sometimes 5 or 6 if I have enough material.
My area in Louisville KY calls for an R-Value of around 40 in the attic. Once everything has dried up, and the foam isn’t sliding around on the MDF, drop your panel down onto the weatherstripping you installed. That is it. You are done.
Attic Scuttle Project Material List
- Be sure to use the good stuff whenever your caulk. 60yr Painters Caulk
- Secure your frame with screws. Most of the times they are poorly nailed in place and weight of the panel can cause them to work loose. Trim Screws
- 3/4 MDF makes for great panel material. Most big box stores sell smaller “Project Panels” so you don’t have to buy a whole 4×8 sheet. MDF Panel
- 2″ Rigid foam insulation is perfect for installing on a removable panel. Foam Insulation



This article is simple yet educational. Thank you for sharing this.
Thank you for creating this article. I learned a lot.
That was a great article. Thanks for sharing the information. Continue doing this.
Thank you for creating this article. I learned a Lot
Very nice. I like your blog.
Thank you!! I think you just solved the mystery of why our daughter’s room is so warm!
Hey Samantha – I hope so! Good luck with fixing the problem.
I have weather stripped the rim which the hatch rests on. Regarding the hatch top itself, I stapled the silver radiant barrier to the top instead of using the ridgid foam board. Will this off any benefit or did i waste my time and a little money?
Thanks!
Hey Gary – If you did not put any insulation on the back of your hatch you’ll want to do that for sure.
Oh ok, I was hoping I could avoid carting home and slicing up that big 8*4 sheet of foam, but I guess the easy way is not going to cut the mustard. Thanks Ben!!
Pretty cool article!
Hi, I live in Louisville ky, my a/c has a tough time maintaining temperature in the summer. My question is spray foam insulation worth the cost to insulate my Attic?
Hey Mike! There are a lot of moving parts with this. Foam is an option, but can be expensive. Have you read my article on How to Insulate Your Attic?
You can do it yourself for a fraction of foam.
Can you instruct me where to put the trim screws to secure the frame?
The screws should go in the thickest edge/middle of the trim. Exact placement is not critical as the goal is to tightly snug the wood to the drywall so you can caulk the seam without large gaps. Be sure you pre-drill the holes so you do not split the trim.
Great Info,
I have been scratching my head on how to insulate a vertical access panel to a no man’s’ land between two roof’s
this will work great ! and i will also do all my 4 horizonal access panels !!
THANKS !
Great to hear. Let me know how it works.
Thank you for sharing! I used this technique to insulate both a scuttle panel and a vertical attic access door in a wall. I also bought an extra piece of foam board to fix to the inside of the door to my HVAC closet, which is in the house and vented to the roof. I noticed that the foam board has a warning printed on it that it is combustible and that a thermal coating or a barrier is required per applicable code. Is that of concern? If so, what needs to be done? Thank you!
Hey David! You could cover your foam with Type-X drywall if you want to make sure the foam is covered.
Can you provide a diagram of where the trim screws should go? And what direction/angle – like are they supposed to be pointed upward and go through the trim into the drywall? Or the other way around from the top down?
Don’t overthink it. As long as the trim screw grabs the ceiling rafter (or some kind of support, it will be strong enough to hold everything in place. Something like this should work great– https://amzn.to/42izAib