Failed Manufactured Stone and Brick Veneer on New Construction Home.
PART 1: THE INSPECTION
I’ll let you in on a little secret. I’ve done so many of these manufactured stone inspections over the years that sometimes I have to fight the urge to not go on autopilot. I take pictures of the same messed-up details on every house: missing weep screed, missing kick-out flashing, missing casing bead, etc., and I give the same explanations as to why these homeowners are in the pickle they now currently find themselves. Click here for a detailed post about missing kickout flashing.
This house was different. Yes, the usual details were botched with the manufactured stone, and it was leaking and trapping water, but that wasn’t its only problem. There was a larger, more expensive list of defects that I was about to uncover on this day that I was not expecting.
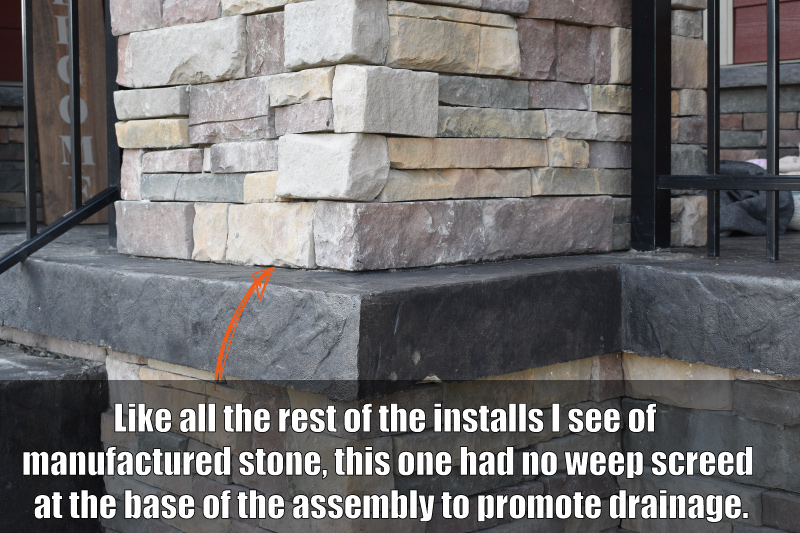
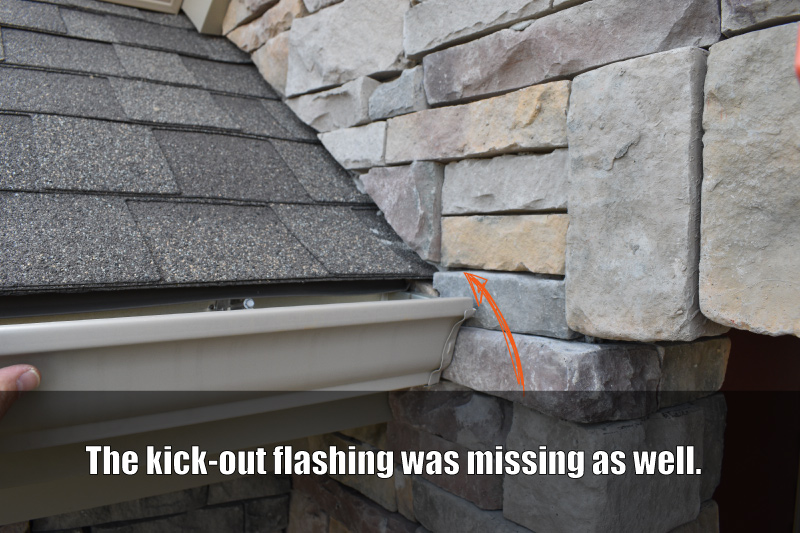
Since we all live in different climates, many of the rules (or building codes) are different and adjusted for our location. However, there are some rules that always remain the same, no matter what part of the planet you call home. One such rule is that we NEVER place wood behind anything made of concrete or masonry. Actually, we never put anything behind concrete or masonry…except more concrete or masonry. No wood, no cement siding, no vinyl siding. Nothing.
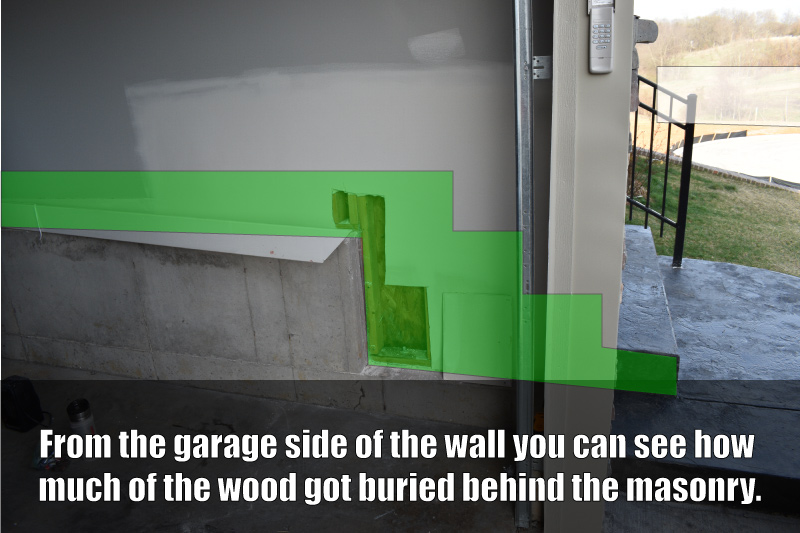
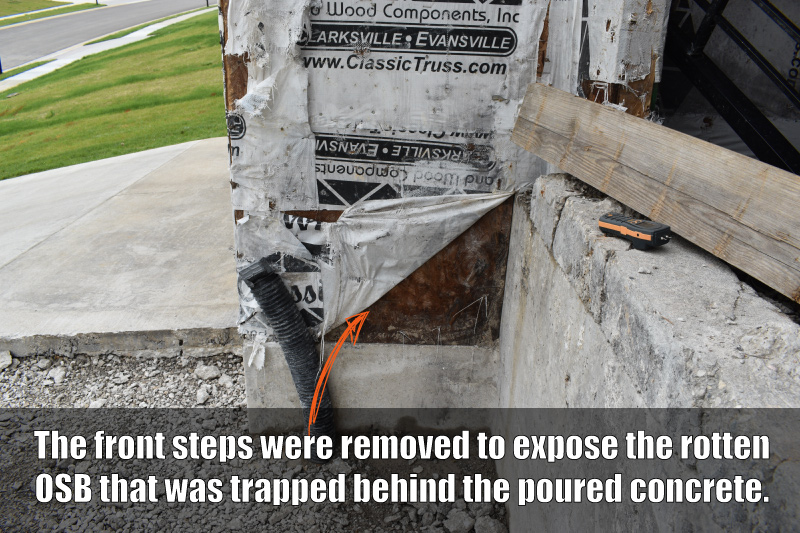
This rule was ignored on the wall of the house and garage, as well as along the front porch cap. The builder installed a concrete stem wall that was too short, and supplemented the height of that wall with wood. This wooden wall, which separates the front porch steps and the garage, was buried behind the manufactured stone and concrete steps. Bulk water started to leak into the garage through the wall not long after the family moved in. The builder tried all he could to stop the water, but nothing worked. The fact is that there is no “magic goo” that will stop water from getting in. It will get in. And when it gets trapped, well…then your wall rots. And that is exactly what happened here.
What should have been done? The stem wall (which separates the steps and garage) should have been made entirely of concrete. And it should have been poured to a higher level so that it protruded past the point of the steps and porch on the other side. This would likely have prevented the migration of water through the assembly.
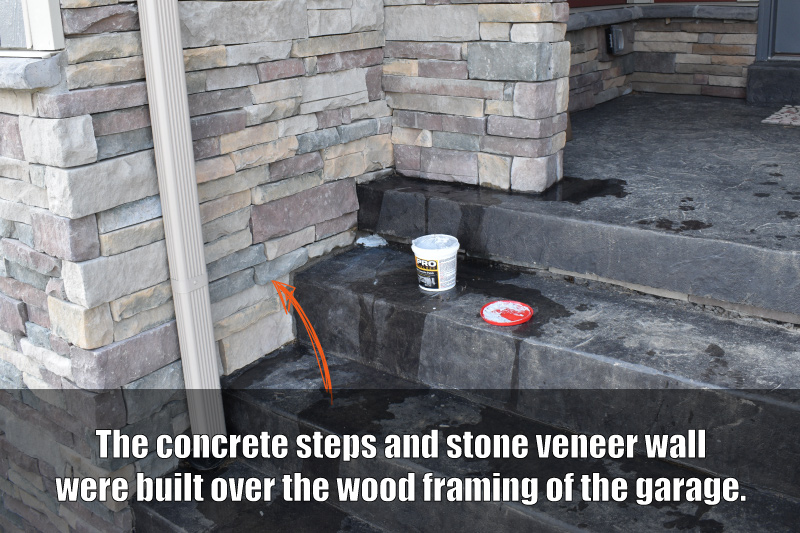
I’ve outlined the steps on the images below so you can understand what is happening here. Once I cut the drywall open in the garage wall, the water damage was visible across the bottom of the wall. It’s amazing to see that just inches away from the water-damaged OSB, the wall sheathing is showing no signs of water damage. I suspect the moisture was wicking down to the base of the wall, and the upper portions of the wall were drying out quickly enough.
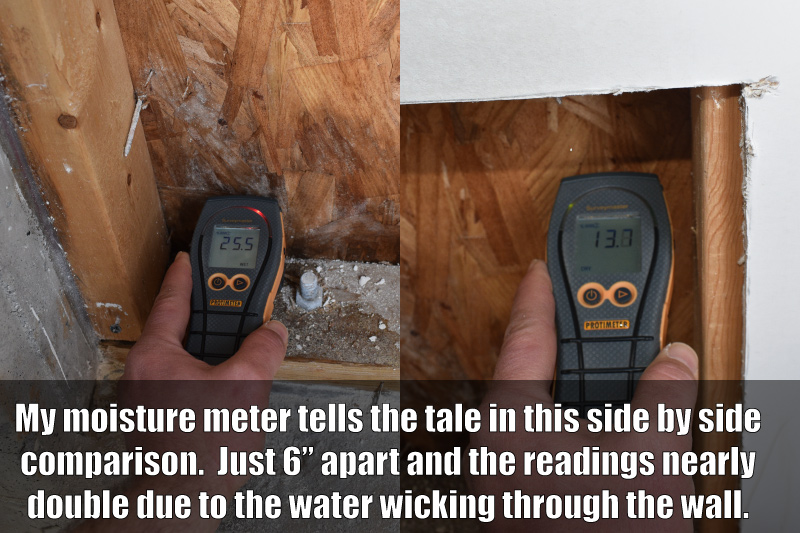
MANUFACTURED STONE LEAKING BULK LIQUID WATER
The tricky thing with failed manufactured stone siding is that most people don’t experience what I call “bulk water infiltration.” Most of the time, it takes years for homes to show signs of a problem with manufactured stone siding because it’s a very small amount of water that gets through the cladding. Sometimes, it’s not liquid water at all, but water vapor that is driven into the wall assembly and gets trapped. (I’ll do a standalone post on vapor drive soon to explain that in more detail.)
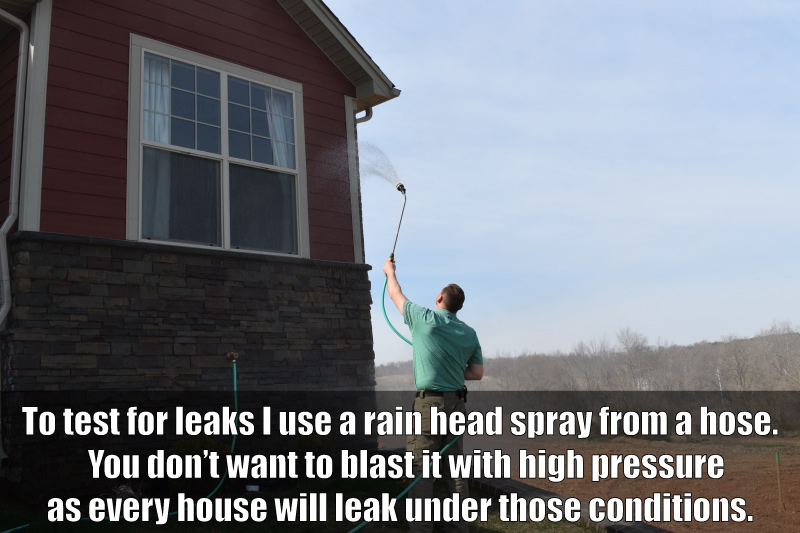
This house, however, did have a rare find: a bulk water leak that could be reproduced with a light spraying from a garden hose. Let me be clear–you have to be sensible when water testing a house in this way. A high-pressure nozzle will almost always cause everything to leak. But a gentle watering hitting the wall above, and allowing gravity to bring the water down the surface is a good way to test for leaks. If water gets in during a scenario like this, odds are that it will leak in a wind-driven rainstorm.
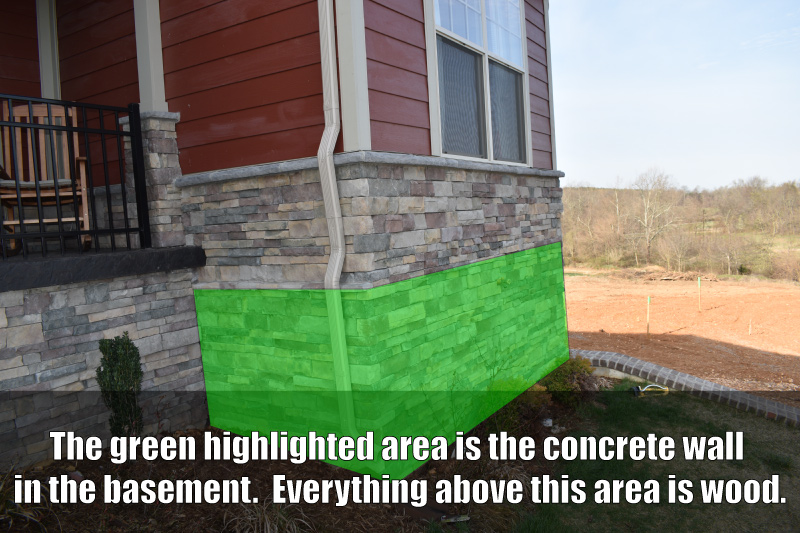
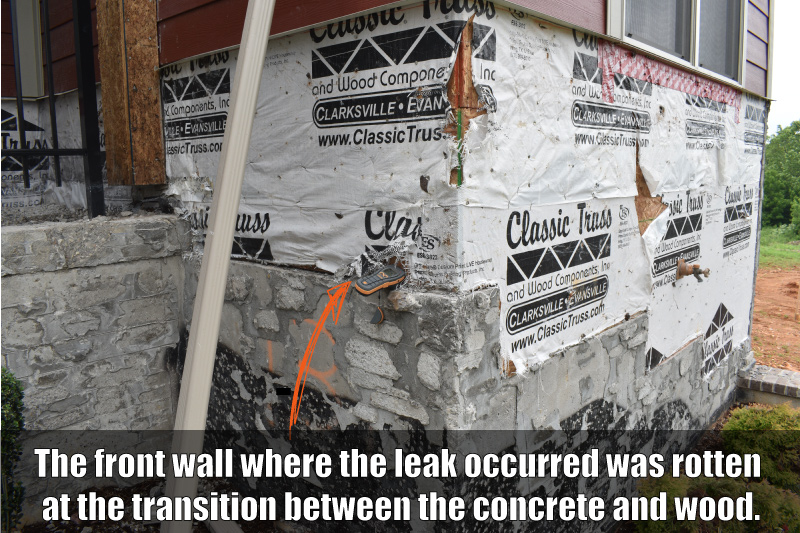
The green area in the picture below is there to act as a guide so you know where the sill plate of the wall lands. This is the point where the concrete foundation stops, and the wood framing of the wall starts. That is the weakest link in the wall assembly (in terms of air and water infiltration), and if things are going to leak, it will likely be at that seam.
This wall also had a weird step-back that the installer did a poor job of covering up with a large 3″ lip of flat manufactured stone. There was no way this wasn’t going to leak. When the water ran down the wall, it hit that flat section and soaked right in.
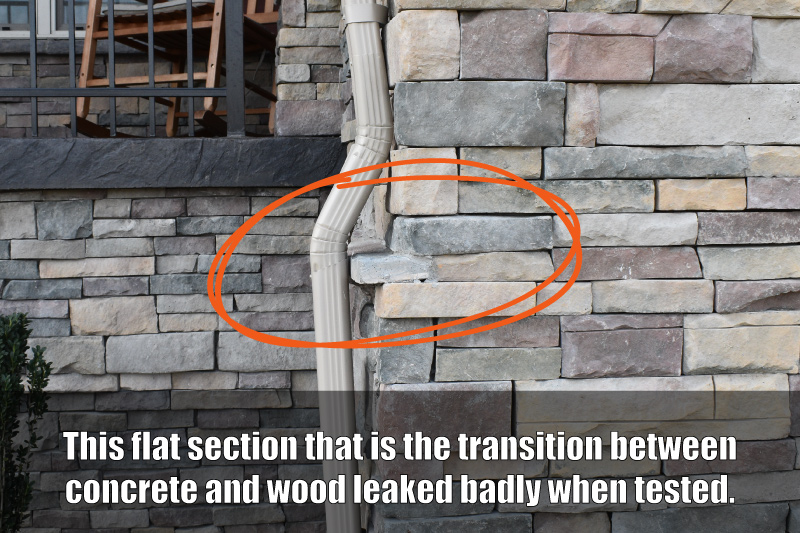
Yep. It took about five minutes for the water to come through the assembly and run down the wall in the basement. To be fair, I think this was mostly because of that ridiculous flat lip that was put into the wall. It acted as a funnel to drive the water back to the house. I’m not 100% sure it would have leaked this badly if that wasn’t present.
The water was coming in between the base of the sill plate and the top of the concrete wall. Luckily, the builder didn’t seal that seam with caulk (which is sometimes done to prevent airflow). Had he sealed it, most of this bulk water would have gotten trapped between the OSB sheathing and the back of the manufactured stone assembly. It wouldn’t have leaked in, but, boy, it would have rotted the wall in a hurry.
FAILED BRICK VENEER LEAKING WATER, TOO…
By now you should be feeling sorry for these people (remember, they are really, really nice people). But their nightmare is just getting started. We know the manufactured stone is botched, and so are the front steps and porch cap, but what if I told you the brick veneer was also failing from installation errors?
Keep this in mind: None of this damage was caused by material failure. All of these problems stemmed from human error. If the readily-available instructions are followed with manufactured stone veneer, brick veneer, cement siding, etc., you should not have these problems. It is when installers do it ‘how we’ve always done it’ that failures occur.
If you have read any of my other posts about manufactured stone,you know that most homes don’t have problems with their brick wall assemblies because there is a gap between the wood and brick called an ‘air gap’ (creative titling, huh?). This decoupling of the two materials is used as a capillary break so that water can’t flow through the brick and into the wood, and it also creates a space for fresh air to get in and help dry things out. But what if none of those things are done? What if the brick and wood are one thick sandwich? Yep. Walls leak, and things rot. Remember, brick walls are NOT waterproof. They absorb water.
Let’s back up a moment. Around my area, most builders form what is known as a ‘drop ledge,’ or a ‘brick drop’ in the foundation wall. You see, bricks are really heavy, and they are stacked on top of the foundation wall when the house is built. This is why when your bricks crack and shift around, it usually means your foundation (which is holding everything up) has moved. Note: Manufactured stone is not stacked on top of the foundation, but instead is stuck to the wall with mortar, hence the name ACMV (Adhered Concrete Masonry Veneer).
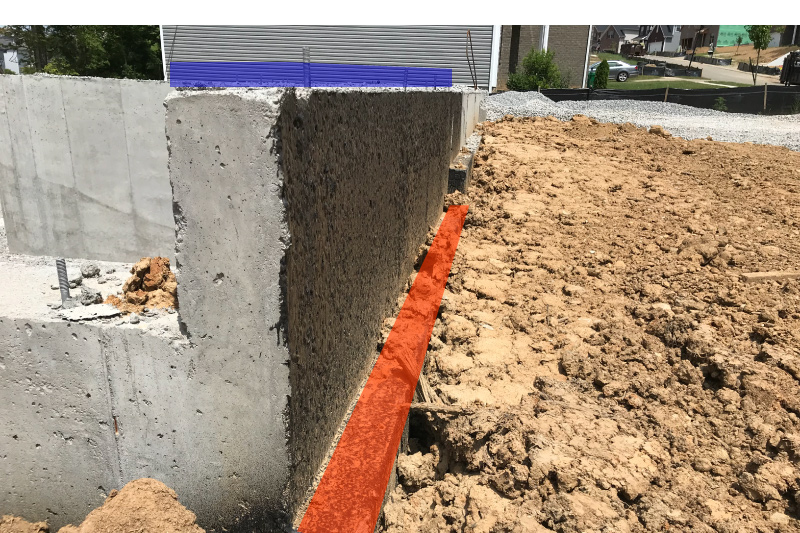
Below is a picture I took at a new development (not the house this article is about) that shows what a brick drop looks like. I highlighted the two areas that are important to this story. The blue ledge on top of the foundation is where all the wood framing of the house will start. The red ledge at the bottom of the wall is where the bricks will start. It’s done this way so that water has a place to run down the air gap between the two layers and it should never reach the wood. The black painted part of the concrete foundation is the air gap.
Now, back to our current situation.
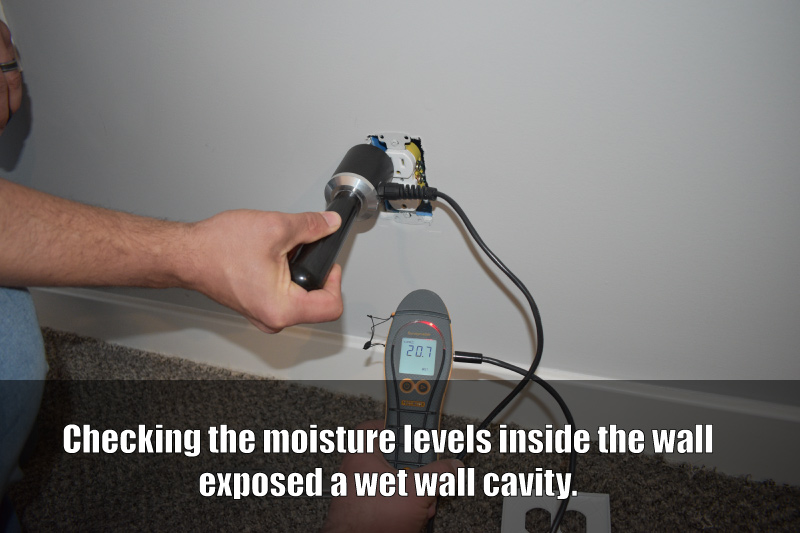
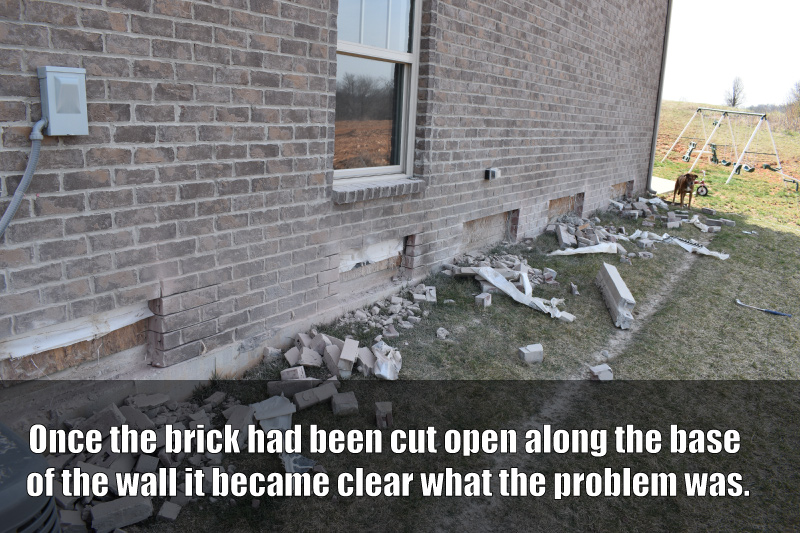
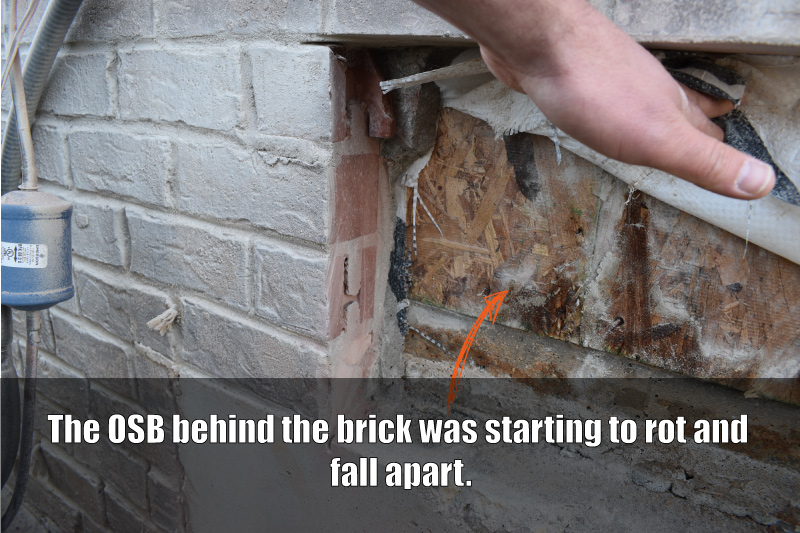
The homeowners had noticed some wet carpet down the sidewall of the house, and I checked the wall to find high levels of moisture almost a foot off the floor. The strange part was that this was the side of the home covered in brick veneer. There was no manufactured stone siding along this wall. Where was the water coming from a foot up the wall? Sure, lots of homes have basements that leak, but not like this. It was puzzling to see moisture so high off the concrete floor. Once we cut the walls open outside, it was clear what had happened…
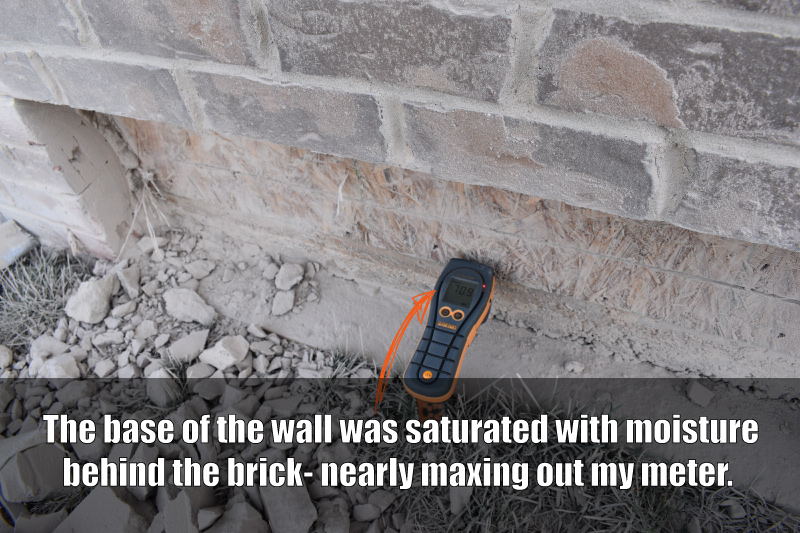
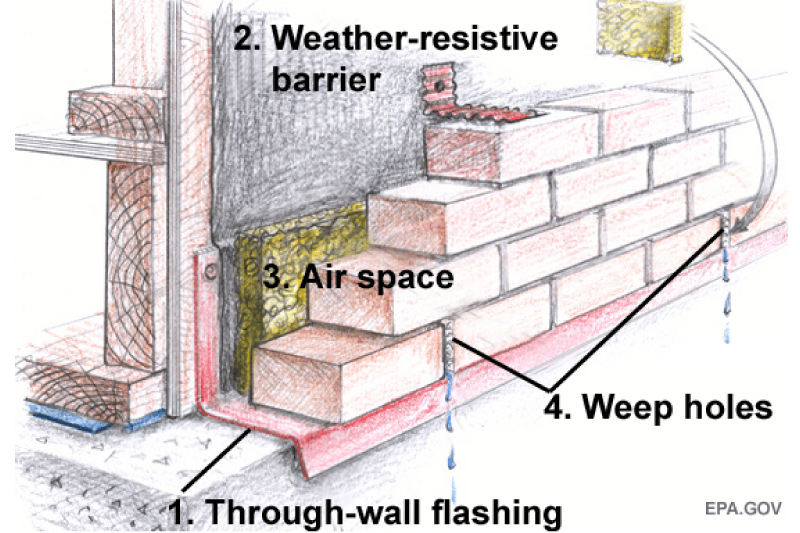
If you refer back to the foundation image just above, you’ll notice the distance between where the brick starts and where the wood starts is a couple feet, maybe a bit more. This gives a much greater margin of error for the brick masons so they don’t need to worry about a build-up of mortar along the back of the brick wall as it is being put together. It also allows for the concrete foundation to be hidden around the house at the base of the ground. However, you still need the through-wall flashing and weep holes a few inches above grade to be properly detailed to guarantee you won’t have water problems around the base of your walls. I’ve seen exactly zero houses detailed correctly. So….yeah.
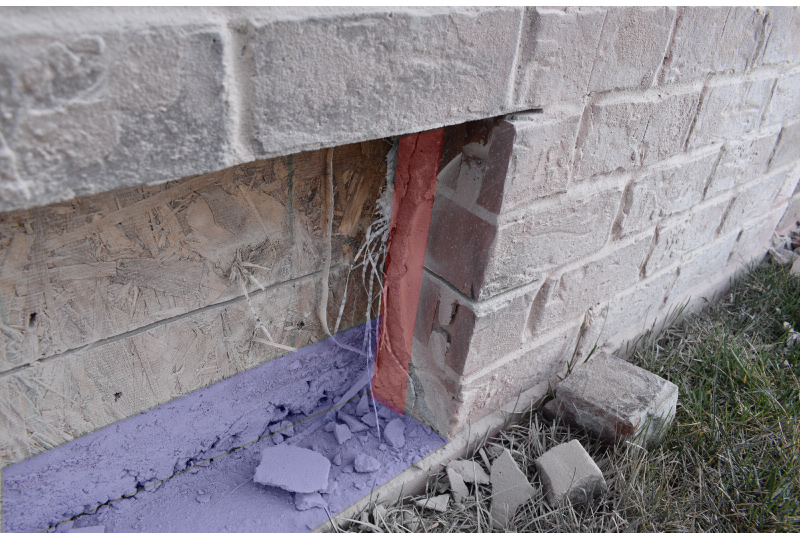
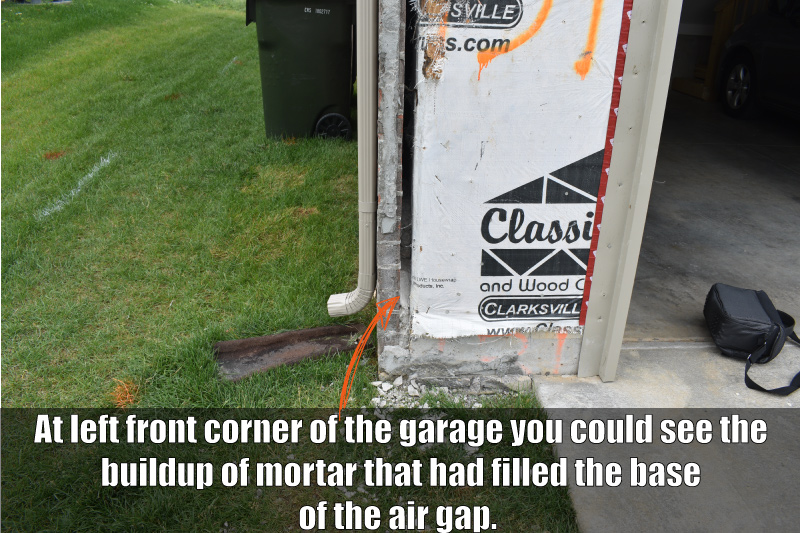
This house didn’t have a deep brick drop. In fact, it had one that was only a few inches tall. The issue with this is that the brick masons did a poor job and let lots of mortar squeeze out the back of the bricks when laying them. All that extra sloppy, wet mortar started to pile up little by little along the back of the brick, and the result was NO AIR GAP between the brick and the wood. As the brick soaks in the water, it gets pulled right back to the wood. Since most builders use OSB for their wall sheathing (which loves to soak in moisture), it doesn’t take long for the water to make it inside the wall cavity. The red line I have highlighted shows you the anatomy of the wall, and you can clearly see the shallow brick drop (blue color) and the filled air gap assembly (red color).
This is why the walls in the basement were wet along the sides where no manufactured stone was installed.
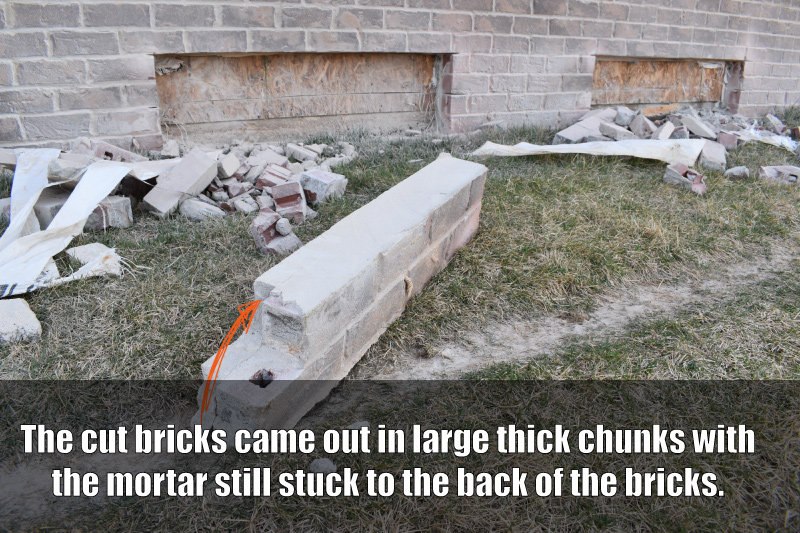
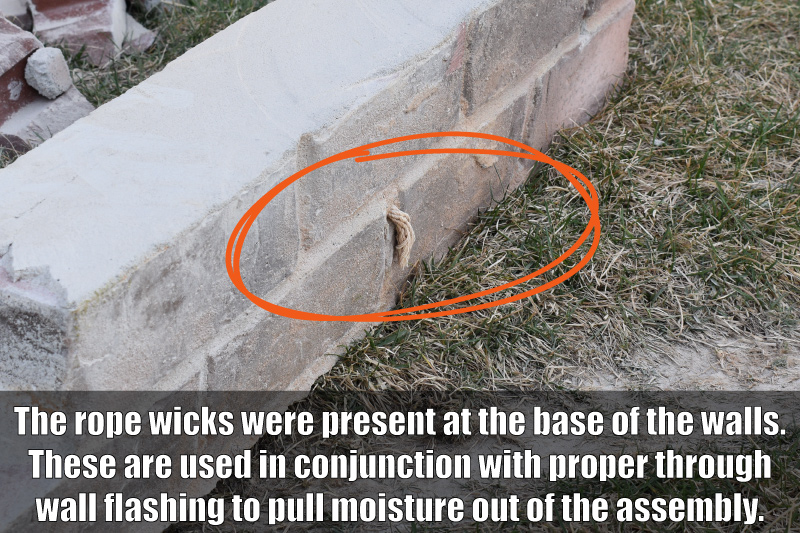
This is a good teachable moment for home inspectors, homeowners, and even builders. You’ll notice in the image above the rope wick hanging out of the chunk of bricks that were cut out of the wall. That is the wick that was installed by the brick masons to draw the moisture out of the wall’s air gap. Sometimes you see these ropes, sometimes there is just a void between bricks every few feet, and sometimes there is nothing at all and the weep system has been omitted altogether.
The other part of this equation is the through-wall flashing that should be present at the base of the wall. Nearly every brick veneer house I look at is missing the through-wall flashing that should be present…even if the ropes and weep holes are installed. And to be honest, most of the time it doesn’t seem to cause any problems. I can’t tell you why it doesn’t–it just doesn’t. My own home is a brick ranch with not one weep hole or rope wick to be found. I also don’t have the through-wall flashing. My assembly seems to perform fine.
Sometimes things can be wrong, and not cause any problems.
And that doesn’t mean your brick home should have these details skipped either. This is not a blanket statement saying it is OK to do things incorrectly. It’s not. Below is a great detail showing how every brick veneer wall should look. But the reality is that very few do.
PART 2: REMOVING THE FAILED MANUFACTURED STONE
After my initial inspection uncovered the botched manufactured stone and the filled air gap of the brick veneer, the builder agreed to remove all the manufactured stone veneer around the house to inspect for water damage. I knew what we would find, but I think everyone else was holding out hope it wouldn’t be that bad.
It was actually worse than I suspected.
Let’s take a look at some of the pictures from my second trip to the house, and what removing the manufactured stone uncovered.
As you can see above, most of the manufactured stone was removed to give us a clear view of the home’s structure, including behind the brick on the sides of the house.
I had hopes that it was only the right side of the home that was leaking with the brick veneer, but once the manufactured stone was removed (image below), it was clear that the air gaps on both sides had been filled with mortar and were rendered useless. We never opened up the back wall, but one would have to assume it was the same way.
The area around the front porch steps and garage wall showed the worst damage of all. The trapped water really did a number of things and caused the OSB to fall apart.
These walls were less than one year old.
That ‘lip’ at the basement where the water leaked in during my water test was soft and rotted, too. The surrounding area of the OBS was starting to rot and mold, but not nearly as badly as the other areas.
This brings up another good point to hammer home: The really serious problems occur when there is a change or interruption in the wall plane. Most installs of manufactured stone actually perform OK in large flat wall planes. But when a window, door, or foundation wall comes into play, it changes things dramatically.
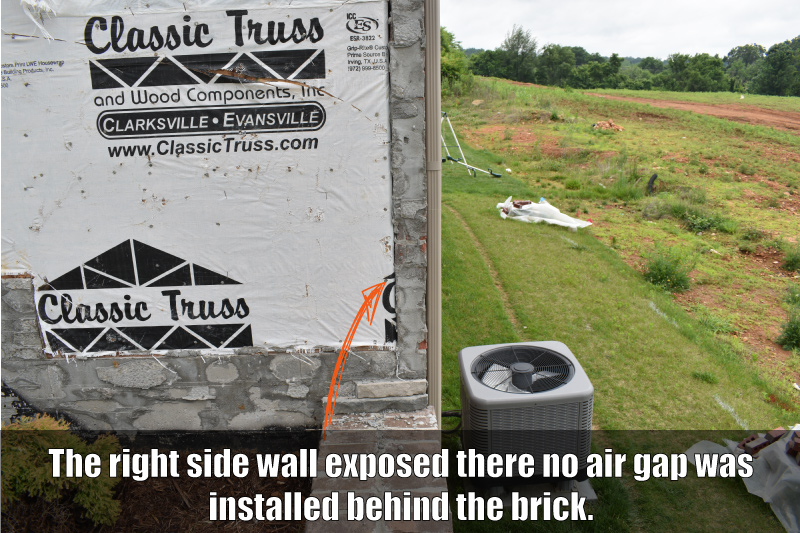
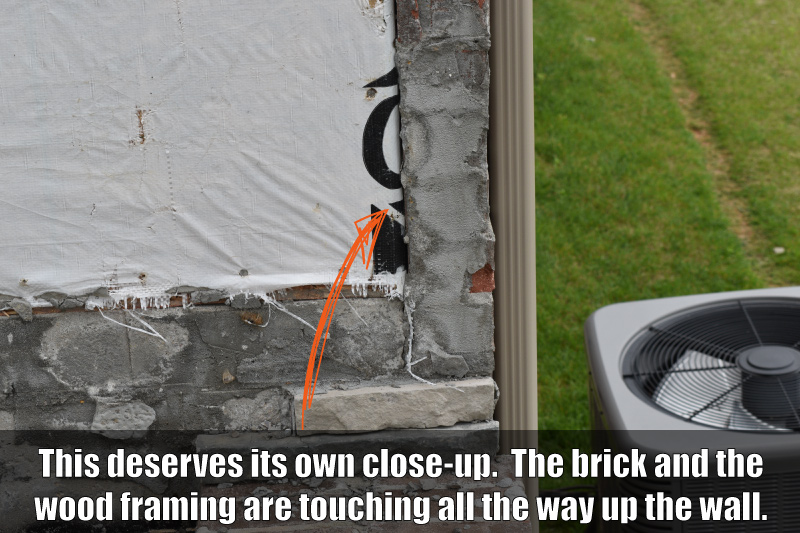
By the time I worked my way around to the right side of the wall, I had to take a double-take, because I could not believe my eyes. The air gap was completely missing between the brick and wood framing.
I’m not sure how this could happen unless the concrete foundation pour was off a few inches and the masons just went ahead and installed the brick on the available brick ledge. I suppose it also could have been the carpenters who mismeasured, and the wood framing was over a bit too much as well. Maybe it was a combination of both. At this point though, it doesn’t really matter. We are left with a wall that will constantly have water problems where the wood and brick are touching.
I suppose it is possible that the framing is twisted, and the brick is only touching the wood at this point…and that it’s not touching as you work your way back from the corner. As bad as it sounds, I hope that is the case.
HOW DO WE REPAIR ALL THIS?
That is the million-dollar question.
The manufactured stone is an easy but extremely expensive repair. Just tear out all the moisture-damaged materials and start over, making certain you incorporate a drainage mat/weep screed into the wall assembly. Before you jump into something like this, though, make sure you have the budget for it. Most repairs in this area run between $80-$100 per square foot…so a 10×10 wall section would cost around $10,000.
The garage wall and the brick veneer are a totally different arena altogether. Leaving the wood products buried behind concrete is a surefire way to develop more problems down the road, and having a brick veneer wall with no air gap won’t work, either. It’s a bad spot to be in, and fixing problems like this could easily cost six figures.
Thankfully, these homeowners didn’t have to face that reality. With the problems that I uncovered, my clients were able to get out of this messy situation, and find a different “happily ever after.”
STONE VENEER
You can learn more about manufactured stone and the problems that come with a poor installation. As always, please feel free to reach out if you have any questions or if I can help with your home.




Wouldn’t expect anything less with you, brother.
Glad these folks had you.
Wouldn’t expect anything less with you, brother.
Glad these folks had you.
Awe…shucks. Thanks, Joe.
Nice work! That took a lot of time to put together, but very helpful and informative.
That it did, Jed. But I think it’s really important to help people understand what can happen when everything goes south. Thanks for reading.
I’m the now retired Education Chairman of the ASHI New England Chapter. I compliment you on your knowledge, inspection skills and deductive reasoning. IMPRESSIVE!
Thank you kindly, Bob.
Thanks Ben! Great information and pictures to drive it home.
Thank you, David.
fantastic, factual, non-opinionated story. you nailed it!
Thank, Jon.
In the upper midwest I know we have all started to pay attention to flashing, drainage and breathability of stucco and manufactured stone….very critical
Important and neccessary for proper installation. Its something that must be taught to the next generation of installers ….I believe that somewhere in the 90s and early 2000 the way that things were …drastically changed . Guys cutting corners. Builders slapping up homes so fast that nobody cared …I’m glad I had Journeyman above me that took time to address flashing and draining. And weep. Keep educating
Amen Joe!
I wish I had found your blog before I built my new house. I’ve got a 4-year-old home that is rotting around all the lower windows from leaking stone veneer.
Hey Chris – I’m sorry to hear about your troubles. Let me know if I can help in any way.
Really informative and love the pictures. I too have a house very similar to yours: brick veneer built in 1998 no flashing, no weeps and no problems. Brick step cavity is very deep, two feet around the house (on a slight grade). I think the step was closer to 5.5 inches in width and there is a slight brick overhang so I think I have a two inch air space. Probably what saves the sill plate and rim joist. Wood in the basement looks pristine. I suppose I’m very lucky.
Loved all the information and happy to see you reported what you found in a manner that we can understand.
Thanks so much, Louisa. I’m happy to hear you dodged the bullet this time around.
“Nearly every brick veneer house I look at is missing the through-wall flashing that should be present…even if the ropes and weep holes are installed. And to be honest, most of the time it doesn’t seem to cause any problems. I can’t tell you why it doesn’t–it just doesn’t. My own home is a brick ranch with not one weep hole or rope wick to be found. I also don’t have the through-wall flashing. My assembly seems to perform fine.”
Wow, your statement could have been written by me because my brick veneer home in VA has no visible flashing or weep holes either. It was built in 1998 by a very reputable mason on a poured concrete basement wall with at least a 4 inch brick step/ledge. Back then the wooden frames used for pouring concrete walls usually provided a 5.5 inch brick ledge. The brick ledge cavity is very deep as the land slopes a bit. I have never had any water issues in my basement. I assume what water makes it behind the brick and mortar migrates down into the brick step cavity (would you agree???).
A few years ago (for energy savings) I had closed cell spray foam in the basement placed in the rim joist and the sill plate (1.5 inches). The rim joist, sill plate and trusses were as pristine as the day they were completed (no evidence of water infiltration). I do have a good eave and large gutters that help control water issues but sometimes the NW winds with rain do pelt the brick siding. Shear dumb luck I suppose that I do not have problems.
I do have reservations about the cell foam though because now I cannot see the sill plate or rim joist. I assume the floor trusses would wick moisture regardless but am not certain (?).
Thank you for such an awesome blog!!
We had our home built 23 years ago and have had no trouble with the brick veneer. We had drivit used as an accent, and have had no problems with that except that it cracked close to the bottom on the front porch. We were considering having it removed and having stacked stone (veneer) installed, but after what I’ve read, I’m terrified to have anything done! What do I ask of potential contractors?
You’ll want to be very careful of doing this. I would question the contractors about their process, and if they do not use a drainage mat behind the stone veneer I would not hire them. Water will get behind this veneer, and you don’t give it a place to drain down and out, it will drain it- and rot your house.
Very informative read. I have a limestone veneer wall with the same sort of rot. There was no air gap installed. Should one have been there?
The air gap requirements will depend on the type of veneer you have. Was your limestone ‘stuck’ or adhered to the wall? If so the only way you can create an air gap is by using a drainage mat (or some other decoupler). If you have a solid anchored limestone wall it should have an air gap, free of mortar droppings and such.
Ben – Do you seal the engineered stone as well? My understanding is that it absorbs water over time. I am in an existing home with engineered stone chimney chase and have had to fix leaks twice now.
Tom
Do you know if your stone is thin veneer natural or cast manufactured?
We just bought a new home and the stone veneer on the interior fireplace and back splash is cracking and there are gaps in between sheets , what should we expect the builder to do?
If the MSV (stone veneer) is only on the interior finish it not going to get wet and cause problems. Unfortunately, a lot of builders around the country and slapping up poorly constructed homes these days and you may have a hard time getting them to ‘fix’ anything.